Neutral Tile Cleaner

York Sandstone Floor Restoration Sevenoaks Weald

Old York Stone Floor Resurfaced and Restored in Sevenoaks Weald

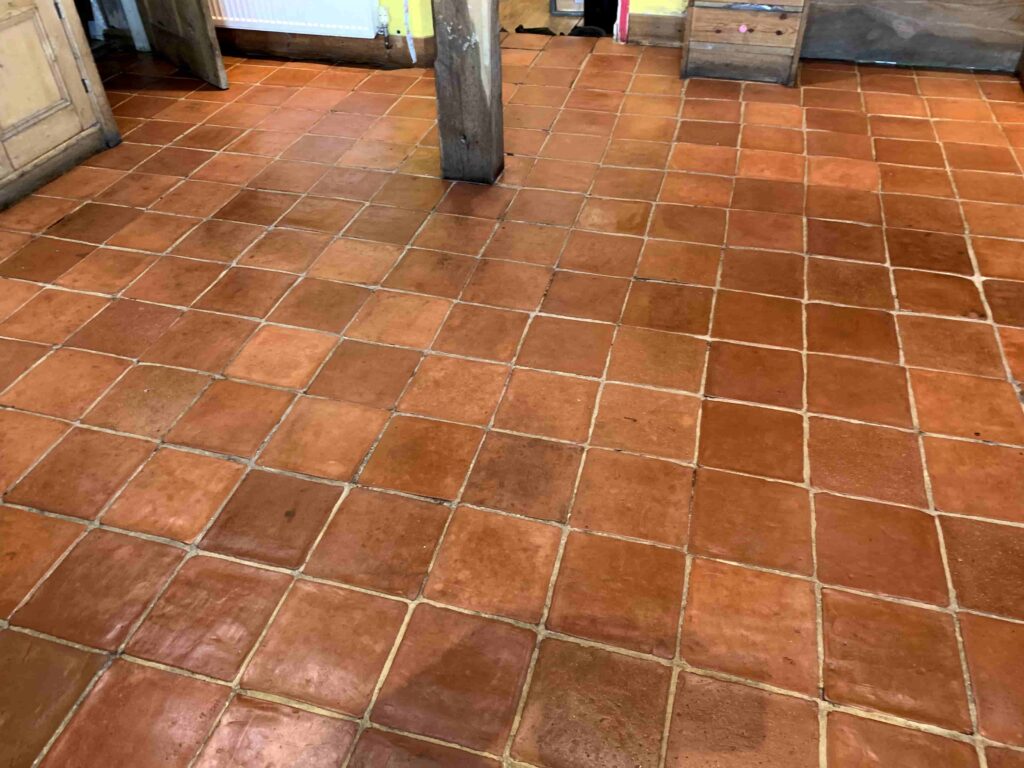
I was asked to give my opinion on restoring a York Sandstone floor at an old house in Sevenoaks Weald. The flagstones were in a bad state, heavily pitted with dirt ground into the stone from hundreds of years of use. The Sandstone flooring spanned across the ground floor, from the porch, a narrow passageway, to a raised dining room and kitchen.

York Sandstone Floor Before Restoration Sevenoaks Weald

I called round to discuss the floor and what could be done to restore its appearance. During the conversation the owner expressed a preference to having the very rough riven nature of the floor reduced and wanted to know the options. Rough stone traps dirt easily and is more difficult to keep clean so I could sympathise with the situation.

I explained that the best course of action would be to mill the stone. Milling is a process championed by Tile Doctor which utilises very coarse diamond pads to remove a thin layer of stone from the surface and then finer grit pads to refine the appearance of the new surface making it smooth and easy to maintain in the process.

York Sandstone Floor Before Restoration Sevenoaks Weald York Sandstone Floor Before Restoration Sevenoaks Weald

I measured up the combined floor space and put together a quotation that included all the products and labour needed to transform the floor, a process which should take three days.

With the quotation accepted and the products ordered and delivered, I arrived on the agreed date to begin work and started by securing a loose flagstone with a rapid set adhesive.

Cleaning a York Sandstone Tiled Ground Floor

The milling started with the application of very coarse 50-grit diamond Flexi-Pads fitted to a heavy-duty floor buffer with added weight to ensure maximum traction with the stone. Using only water for lubrication these pads do the bulk of the work and remove a fine and often contaminated layer from the surface of the stone to reveal new stone underneath.

York Sandstone Floor During Milling Sevenoaks Weald

This is the slowest part of the job with each flagstone requiring five to ten minutes of milling before moving onto the next. A lot of water was used in this process which mixes with the cut stone to form a slurry which is then vacuumed away. It took a full day to cover all the floors, and I got through three of the 50-grit pads in the process.

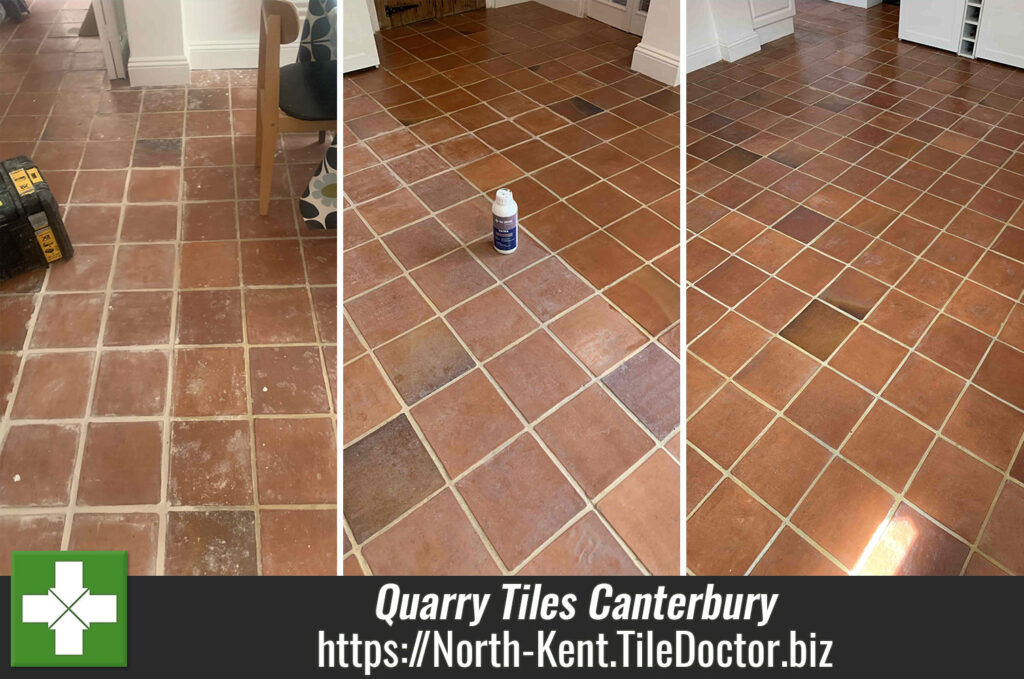
On my return the following day, I could see the floor had dried and the slabs now looked quite pale and ‘washed out’, which was to be expected at this early stage.

The process from here ran significantly quicker. A finer 100-grit flexi pad was applied next, followed by 200-grit flexi pad, a 200-grit soft diamond pad and finally a 400-grit soft diamond pad. Less and less slurry was produced as I worked through each of the finer grit pads. Again, using water for lubrication and removing the slurry with a wet vacuum as work progressed.

The floor was then mopped through twice to remove any residual dried slurry and then left to settle and fully dry out.

Sealing a York Sandstone Flagstone Floor

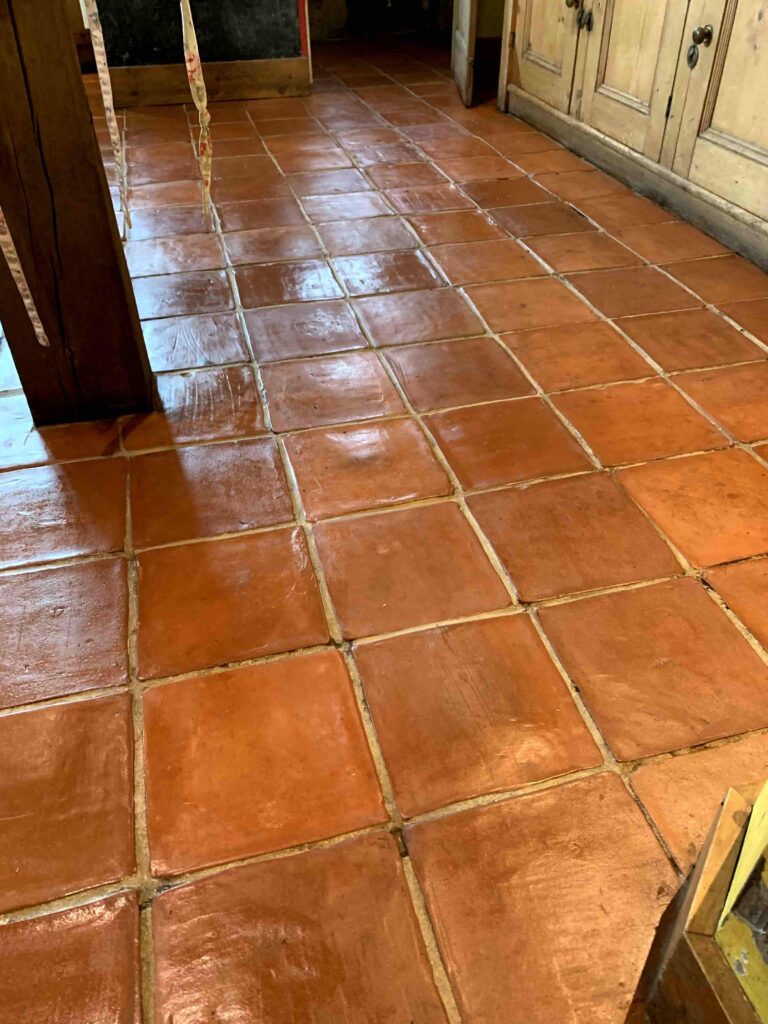
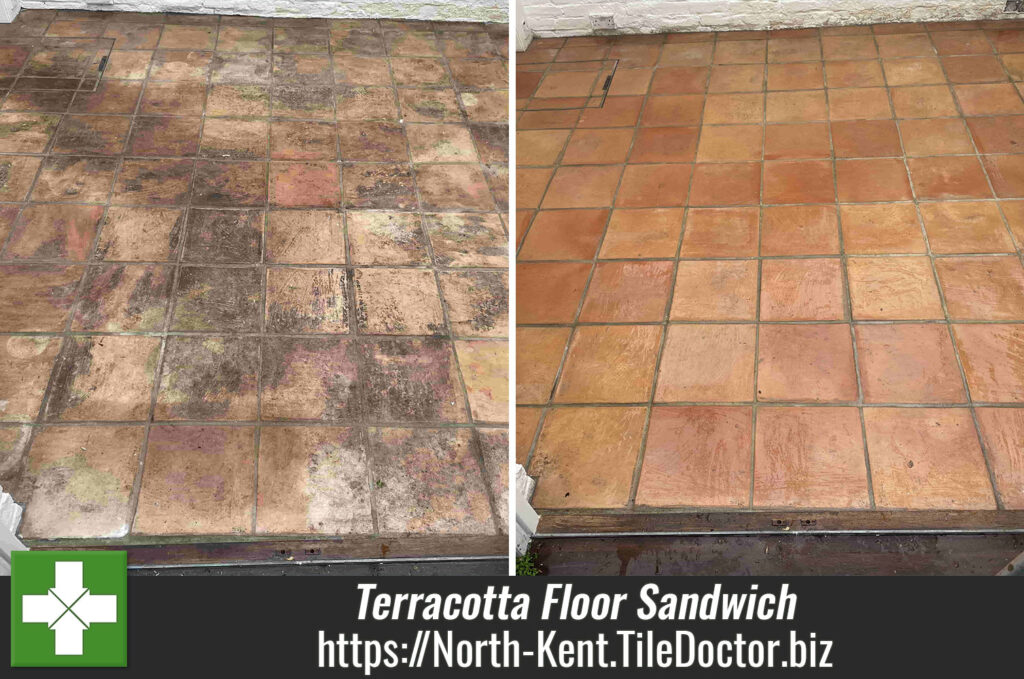
Two days later, I returned to inspect the floor. Lovely pastel greens, browns and grey colours were now evident in the flagstone along with the natural patterns and veins which gave the floor so much more character than it had before. Most of our sealers come with a colour intensifier. However, I strongly felt that the floor looked amazing as it was which was readily agreed by the owner. So, Tile Doctor’s Ultra Seal was opted for. This is a natural look, impregnating sealer which protects the floor without changing its appearance.

York Sandstone Floor After Restoration Sevenoaks Weald

Three coats of Tile Doctor Ultra Seal were applied to complete the job, and the floor was ready for foot traffic two hours later. I’m not sure the photographs do the floor justice but hopefully you can see that it has become much cleaner, lighter and the process has revealed so much more character in the stone. Additionally with the stone being smoother than before along with the new sealer it will be much easier to keep clean going forward.

York Sandstone Floor After Restoration Sevenoaks Weald York Sandstone Floor After Restoration Sevenoaks Weald

The sealer ensures dirt remains on the surface where it is easily cleaned away. It’s important therefore to use a maintenance cleaning product that won’t damage it. With this in mind I left a complimentary bottle of Tile Doctor’s Neutral pH Cleaner with the owner.

York Sandstone Floor After Restoration Sevenoaks Weald


Professional Restoration of a York Sandstone Floor in North Kent

Old York Stone Floor Resurfaced and Restored in Sevenoaks Weald Read More »

Terracotta Tiled Conservatory Floor Renovation Staplehurst

Terracotta Tiled Conservatory Floor Cleaned and Sealed in Staplehurst

This Terracotta tiled floor was installed in the 11m2 Conservatory of a property near Staplehurst. The owner was unhappy with the water staining that was spoiling the appearance of the tiles and decided it was time to have the Terracotta cleaned and resealed.

I went over to survey the floor and provide a quote for the work. I could see that tiles were in good physical condition however Terracotta is very absorbent and it was clear that any sealer present on the floor was now failing making it difficult to clean and therefore mark free.

Terracotta Tiled Conservatory Floor Before Cleaning Staplehurst

As part of the survey, I ran a test clean on part of the floor ed a tile as a test and the results looked good. I left, asking the owners to wait until the tile had dried fully to let me know the result. The next day, the report was that the tile had improved significantly and they were keen to progress pending a quote. I duly submitted a quote that they agreed upon and the work was scheduled in.

Terracotta Tiled Conservatory Floor Before Cleaning Staplehurst

Knowing how much water would be absorbed into the Terracotta during the cleaning process this was always going to be a two-day job, one day to clean and then when dry one day to seal.

Cleaning a Terracotta Tiled Conservatory Floor

Upon arrival, the owners had kindly removed all furniture and opened all the windows, this was much appreciated as the temperature that day was due to approach 29 degrees Celsius!

First job was to clean the floor with a generous dilution of Tile Doctor Pro-Clean, which is a strong alkaline tile cleaner that’s safe to use on all types of tile and stone. The Pro-Clean was left to soak in for ten minutes to give it time to breakdown the dirt and any remaining sealing. The floor was then scrubbed with a Black scrubbing pad fitted to a rotary buffer to loosen the dirt and bring it to the surface where it could be extracted with a wet vacuum.

The floor was then inspected and Remove and Go used to spot clean several paint splashes on the tiles left over from decorating. I then turned my attention to the grout which needed further attention. The pads can struggle to reach into the recesses of the grout lines so I find it more effective to get on my hands and knees and scrub these by hand with a wire brush and more Pro Clean.

Terracotta Tiled Conservatory Floor During Cleaning Staplehurst

During the inspection of the floor, I noticed some areas were stained with White efflorescent salts which were spot treated with a solution of Grout Clean-Up. The acid in this product dissolves the salts and the residue was sponged off. Finally, I rinsed the floor in stages, replacing the water every 10-12 tiles and extracted with a wet vacuum. I repeated this process 2 more times to make sure any trace of cleaning product had been removed.

Terracotta Tiled Conservatory Floor Before Cleaning Staplehurst

Even with the heat and the glass, the tiles would not dry out that day and having gone as far as I could, I called it a day.

Sealing a Terracotta Tiled Conservatory Floor

I left it three days before returning to seal the floor; the tiles were certainly dry enough to seal but unfortunately the gallons of water had used during the cleaning process had resulted in more efflorescence salts being deposited on surface as it dried out.

To counter this the affected areas were given an acid rinse using more Grout Clean-up which was brushed in and then rinsed off and extracted with the wet vacuum. I then ran some errands and sat in the van doing some follow-up whilst waiting for the affected tiles to dry out.

With agreement from the owners, we had opted to use Tile Doctor Seal and Go Extra to seal the Terracotta. This is a modern acrylic breathable sealer that leaves a nice low sheen finish on the tiles, additionally it has a built-in colour intensifier that will help highlight the unique patterns in each tile. Three coats were needed and mercifully, the day was cooler making the job so much easier! The new sealer will ensure dirt remains on the surface of the tile where it is easily cleaned away with regular cleaning.

Terracotta Tiled Conservatory Floor After Cleaning Staplehurst

Despite the sun and shadows coming through the conservatory glass, I think you can see from the photos how the stains were removed and a lovely finish was achieved! The last thing to do was provide aftercare instruction on how to best look after the sealer with Tile Doctor’s Neutral pH Cleaner which is a gentle yet effective product for cleaning sealed tiles.

Terracotta Tiled Conservatory Floor After Cleaning Staplehurst


Professional Cleaning of a Terracotta Tiled Conservatory in North Kent

Terracotta Tiled Conservatory Floor Cleaned and Sealed in Staplehurst Read More »

Sandstone Floor Renovation Maidstone

Sandstone Tiled Kitchen Floor Renovated in Maidstone

A couple from Maidstone contacted Tile Doctor earlier this year regarding their Sandstone tiled floors which needed rejuvenating. After a brief exchange of emails, we arranged a date for a site visit so I could survey the floors and come up with a renovation plan.

They had two tiled floors that required attention, totalling around 30m2. There were two rooms that required attention, that larger of which was covered by a carpet and the other was a utility room. Tests in the Utility Room proved that the stone and grout would clean up well and demonstrated that the varied natural colours in the stone would result in a lovely finish.

Sandstone Floor Tiles Before Cleaning Maidstone

Based on the tests I put together a renovation plan and quote which was readily accepted, and a date agreed for the work to commence. My only proviso was that the carpet needed to be taken up prior to my arrival.

Sandstone Floor Tiles Before Cleaning Maidstone

Cleaning a Sandstone Tiled Floor

Upon arrival for the start of the work, it was clear that the carpet had been protecting the floor and keeping the Sandstone in good condition. However, there were some stubborn adhesive marks where the carpet gripper had been stuck to the tile that would need dealing with. I had anticipated this and was able to soften the glue with an application of Tile Doctor Remove and Go so it could be removed with a stiff brush.

Given the uneven, riven nature of the stone and the wide grout lines, I opted to use a Silicon Carbide Brush to clean the floor. The pad is applied with a rotary floor buffer in conjunction with plenty of water and Tile Doctor Pro-Clean which is a strong alkaline tile and grout cleaning agent.

The process pulled the dirt out of the Sandstone turning the water black and this was the removed using a wet vacuum as I went along. The floor was then inspected, and it was onto my hands and knees to clean the grout, stubborn marks and any areas that the buffer had been unable to get to.

Last step of the cleaning process was to give the floor and acid rinse using Tile Doctor Grout Clean-Up to further clean the floor and neutralise its pH level after the alkaline cleaner. Another rinse with water, extraction with the wet vacuum and the cleaning was complete.

Both floors were then left to allow them to dry out overnight so they would be ready for sealing the next day which is when the magic happens.

Sealing Sandstone Floor Tiles

The next day, I returned and although the floors looked dry, I tested several areas with my moisture meter to be sure. Its not a good idea to apply a sealer to a damp floor as it can affect the result.

Sandstone Floor Tiles During Sealing Maidstone

To seal this floor, I used Tile Doctor X-Tra Seal which is an oil-based impregnator sealer that contains a colour intensifier. It’s a hard-wearing sealer that’s perfect for enhancing the natural colours within the stone. Only one coat of sealer was needed which was applied by rubbing into the stone with a cloth, it dries very quickly however it can take up to twelve hours to fully cure.

Sandstone Floor Tiles After Cleaning Sealing Maidstone

Being an impregnator, X-Tra Seal soaks into stone occupying the pores and preventing dirt from residing there. This ensures dirt remains on the surface where its easily cleaned away.

Sandstone Floor Tiles After Cleaning Sealing Maidstone

As I progressed, I was pleased to see that my expectations on the outcome were being met! One tile, when sealed, even showed evidence of a prehistoric, fossilised plant that wasn’t obvious before.

Sandstone Floor Tiles After Cleaning Sealing with Fossil

With the floor cleaned and sealed, all that remained was to advise the couple on aftercare cleaning for which I left them with a bottle of Tile Doctor Neutral pH Tile Cleaner.

Sandstone Floor Tiles After Cleaning Sealing Maidstone


Professional Restoration of a Sandstone Tiled Floor in Kent

Sandstone Tiled Kitchen Floor Renovated in Maidstone Read More »

Red Black Victorian Tiled Floor Restoration Edenbridge

100 Year Old Red and Black Victorian Tiled Floor Restored in Edenbridge

I was recently asked to renovate a Red and Black Tiled floor at a Victorian era house near Edenbridge. The property had recently been purchased and the new owner was performing a complete makeover before he and his wife moved in.

Red Black Victorian Tiled Floor Before Cleaning Edenbridge

The tiled floor in question in the building site was to be the Kitchen floor. It was a heavily soiled however the good news was that the tiles themselves were in good physical condition. They were thick tiles at approximately 18mm deep and this undoubtedly contributed to them withstanding the rigours of time. I worked out a comprehensive price for the restoration, submitted the quote and was awarded the work.

Red Black Victorian Tiled Floor Before Cleaning Edenbridge

Deep Cleaning a Red and Black Victorian Tiled Floor

This was a two-day job and the first day was all about the clean. Upon arrival, and fearing drying issues, I organised for heaters and a dehumidifier to be supplied. Old floors like these don’t have the benefit of a damp proof membrane under the floor so can take much longer to dry out.

With plenty of water and a strong solution of Tile Doctor Pro-Clean, a powerful alkaline cleaner, I worked them in with a Carbide brush attached to the big buffer. This gave a good initial clean and the brush was able to flex into the pits of the 100-year-old worn tiles. The resultant slurry was removed with a wet vacuum as I went. Then, it was a hands and knees job with the rotary with a smaller brush attachment to get right up to the edges and into the corners.

Red Black Victorian Tiled Floor During Cleaning Edenbridge

The floor has some remnants of cement remaining which I removed with a chisel as I went along. I then changed the brush attachment on the big buffer for a 400-grit burnishing pad and repeated the process, giving the floor a 2nd treatment, followed by hands and knees and a six-inch version of the same pad.

Another issue I had to deal with were old paint marks which were spot treated with Tile Doctor Remove and Go. The last thing to do was neutralise the alkalinity of the floor after using Pro-Clean with an acid wash using Tile Doctor Grout Clean-Up. This was mopped onto the floor and then rinsed off.

Normally, with newer floors, I would return the next day to seal the tiles but given my concerns over the floor conditions and thickness of the tiles, I felt more time was needed. The tiles needed to fully dry with the aid of the heaters and dehumidifier.

Sealing a 100-Year-Old Victorian Tiled Floor

Two days later, I returned and took damp readings from several areas using a moisture meter. This showed the tiles were dry enough but my more immediate issue was the prolific efflorescence that had appeared. Efflorescence can occur when wet tiles dry and soluble salts come to the surface as a white foam and dry as a White salt.

Red Black Victorian Tiled Floor During Efflorescence Cleaning Edenbridge

I consider this to be a good thing, as if it is going to happen then you want it to happen on your terms. i.e. before the sealing process starts. A very hot bucket of water and a wrung-out mop with another dose of Grout Clean-Up shifted the efflorescence and left the floor to dry for a while to allow the tiles to dry again.

Later, more moisture tests proved the floor was ready to be sealed and I was able to make a start on sealing the tiles. For this type of tile and situation, my strong preference is Tile Doctor’s X-Tra Seal, an oil-based, impregnator sealer which is formulated with a colour intensifier. Additionally, this sealer is fully breathable so any moisture will rise through the tile and evaporate at the surface un-hindered. I applied one liberal coat, allowed it to soak in and buffed off the excess with a White pad and allowed the floor to dry once again.

I then returned to apply a very thin second layer and buffed that off, too. The colour intensifier ensured that the black became blacker and red tiles a deeper red resulting in a very satisfying finish!

Red Black Victorian Tiled Floor After Cleaning Edenbridge

With the job done, I left the premises having texted the owner photos of the finished floor. Later, I got the following response:

“Just went and had a look. Really pleased with it thanks.”

For aftercare cleaning of Victorian tiles I recommend the use of Neutral Tile Cleaner which is designed for the maintenance of sealed floor tiles.

Red Black Victorian Tiled Floor After Cleaning Edenbridge


Professional Cleaning of a Victorian Tiled Floor in North Kent

100 Year Old Red and Black Victorian Tiled Floor Restored in Edenbridge Read More »

Terracotta Tiled Kitchen Floor Maintained in Faversham

Terracotta Tiled Floor Deep Cleaned and Sealed in Faversham

I was called to a rural area near Faversham where my clients owned a large old house with an expansive Terracotta floor that needed renovation. The house had been extended at some point and the whole lower floor was tiled with Terracotta which had previously been professionally deep cleaned and sealed some years prior by one of my Tile Doctor predecessors. As such, they were aware of the processes involved and had high expectations!

Terracotta Tiled Kitchen Floor Before Cleaning Faversham

Although the sealer had stood the test of time, it had now worn thin on the most heavily used areas of the floor. Those areas were now allowing dirt to become trapped in the pores of the tile, so it was now due another deep clean and reseal. I performed a survey, discussed which sealer options they preferred, and submitted my quote. With the quote accepted, the dates were agreed, and the products were ordered to be delivered to their property well ahead of my arrival.

Terracotta Tiled Kitchen Floor Before Cleaning Faversham Terracotta Tiled Kitchen Floor Before Cleaning Faversham

Cleaning a Terracotta Tiled Hallway Floor

Previously, this had been a three-day job, but I enlisted the help of a colleague for day one to help get the work done in two. Work started with the use of a carbide brush attached to a rotary buffer machine to work a strong dilution of Tile Doctor Pro-Clean into the floor. This is our go to Tile and Grout Cleaner which is safe to use on all types of hard floor.

This not only took most of the old sealer off, but as the bristles flexed, they also cleaned most of the wide grout lines. The muck and the slurry were extracted with a wet vacuum. The next stage was for the pair of us to get on our hands and knees with wire brushes and more Tile Doctor Pro-Clean to get the grout lines fully dirt-free. A black pad was then fitted to the buffer and the tiles were cleaned again, and the last vestiges of the sealer removed.

Next the floor was treated to an acid wash using Tile Doctor Grout Clean-Up which was mopped onto the floor. This further cleans up the tiles by removing any stubborn mineral deposits and grout smears, being acidic it also neutralises the pH level of the floor following the use of Tile Doctor Pro-Clean which is a strong alkaline. This was then rinsed off with water and extracted with the wet vacuum as before.

Terracotta is a very porous stone and given a lot of water had been applied during the cleaning process I was aware it could take some time for the tiles to dry. As a result, I left the floor to settle down and dry out for the following couple of days before I revisited to apply the sealer.

Sealing a Terracotta Tiled Kitchen Floor

The couple had been very happy with the look of the last sealer and its durability. So, they opted to go for more of the same. The product used was Tile Doctor Seal and Go Extra which is a water-based sealer that results in an attractive low sheen finish. Three coats were needed to fully seal the Terracotta.

Terracotta Tiled Kitchen Floor After Cleaning Faversham

They were very happy with the results and that I had lived up to their expectations. The last thing to do was provide aftercare instruction on how to best look after the sealer with Tile Doctor’s Neutral pH Cleaner.

Terracotta Tiled Kitchen Floor After Cleaning Faversham


Professional Cleaning of a Terracotta Tiled Kitchen in North Kent

Terracotta Tiled Floor Deep Cleaned and Sealed in Faversham Read More »

Terracotta Kitchen Floor Tile Renovation Herne Bay Farmhouse

Dirty Terracotta Farmhouse Floor Deep Cleaned and Sealed in Herne Bay

I was called to a large working farmhouse near Herne Bay to look at renovating a heavily soiled Terracotta tiled kitchen floor. Kitchen floors are one of the busiest in any house but even more so in a farmhouse where muddy boots and paws were frequent visitors.

Terracotta Kitchen Floor Tiles Before Cleaning Herne Bay

Having inspected the floor I asked if it would be ok to do a cleaning test, so they could see the potential improvement and I could work out which products would have the best effect. I was confident I could have a major impact on the floor so I chose an unobtrusive tile under one of the counter tops to do the test, this way if the family decided not to progress with the work, then a glaringly clean tile wouldn’t be centre stage!

Terracotta Kitchen Floor Tiles Before Cleaning Herne Bay Terracotta Kitchen Floor Tiles Before Cleaning Herne Bay

I cleaned the tile and demonstrated my results to the husband who would show it to his wife later that day. In the meantime, I put together a quote and emailed it through. Suitably impressed, they awarded the job to me but on the understanding that Christmas and New Year were to get in the way and that the work would need to happen in January.

Cleaning Dirty Terracotta Floor Tiles in Herne Bay

Dates were agreed upon and when they came about, I turned up at 9am sharp on the first day. Every floor is different, and I found that the best result for this particular floor was achieved by hand scrubbing the grout lines with a wire brush and a strong dilution of Tile Doctor Pro-Clean, a powerful alkaline cleaner. The tiles were then cleaned individually using a six-inch carbide brush fitted to a handheld buffer.

I managed to extract a lot of ingrained dirt from the pores of the Terracotta, so It was clearly some time since the tiles had been sealed. The cleaning solution soon turned into a dark slurry which was rinsed off with water and extracted with a wet vacuum. The floor then needed washing with a mop and bucket and further cleaning with a 17-inch Black scrubbing pad fitted to a floor buffer to make sure the floor was as clean as it could be. After another rinse and extraction with the wet vacuum I was satisfied. The work was time consuming, but well worth the effort to see the tiles transformed.

Terracotta is made from clay and like a sponge very porous, the tiles were now dark with the water they had absorbed and needed to dry out before the final step of applying a sealer could happen.

I had already arranged to leave a full day in-between before returning to seal and left a damp meter with the owners so they could check the tiles themselves. A day of drying was sufficient however and I got a call the night before that the tiles were sufficiently dry.

Sealing Old Terracotta Floor Tiles in Herne Bay

When I arrived the following morning, the floor looked so much lighter and 100% cleaner. Having retrieved my damp meter, I checked the moisture levels in the floor and confirmed it was ready to be sealed.

Having discussed desired finish with the clients during my initial visit it was clear they wanted the tiles to have a subtle sheen. From this I chose to seal the Terracotta with Tile Doctor Seal and Go Extra, this is a topical sealer which works very well on porous clay tiles and would produce the sheen finish they wanted.

Seal and Go Extra works by forming a breathable barrier over the tile, thereby keeping dirt on the surface where is can easily be removed through regular cleaning. Three coats were applied allowing each coat to dry before applying the next. The colour intensifier in the sealer, along with the sheen, totally transformed the tiles.

Terracotta Kitchen Floor Tiles After Cleaning Sealing Herne Bay Terracotta Kitchen Floor Tiles After Cleaning Sealing Herne Bay

The customers’ expectations were comfortably exceeded, and they were so happy with the result they left the following glowing review:

‘Our floor looks incredible, better than we could have hoped for. It has changed our whole kitchen for the better. Graham was really nice and did a thorough and efficient job with beautiful results’

On the subject of regular cleaning, I recommended they use Tile Doctor Neutral Tile Cleaner, this will ensure that the floor is cleaned without compromising the newly applied sealant. Household cleaners tend to contain strong chemicals such as bleach which will break down the sealer prematurely, so always check the label.

Terracotta Kitchen Floor Tiles After Cleaning Sealing Herne Bay


Professional Cleaning of a Terracotta Tiled Farmhouse Kitchen Floor in Kent

Dirty Terracotta Farmhouse Floor Deep Cleaned and Sealed in Herne Bay Read More »

Efflorescent Stained Terracotta Floor Renovation Edenbridge

Efflorescent Salt Stained Terracotta Floor Renovated in Edenbridge

This customer from Edenbridge asked me to renovate their Terracotta Kitchen floor which has been ruined by a water leak from the dishwasher. The water had caused enormous amounts of damage throughout the lower floor and had resulted in the appearance of white efflorescence as it dried out. Unfortunately, the floor had previously been sealed with some sort of lacquer which the efflorescent salts couldn’t get past resulting in a build-up under the lacquer on many of the tiles.

Terracotta Kitchen Floor Before Cleaning Edenbridge

To resolve, the lacquer needed to be stripped off, the floor cleaned and dried and then re-sealed with a breathable sealer that could cope with the efflorescence should it re-appear. I created a quote for the work which would take two days and emailed it over to the customer. They were relieved to have found someone who understood the problem and had a solution so accepted the quote and a date was agreed for the work to start.

Terracotta Kitchen Floor Before Cleaning Edenbridge Terracotta Kitchen Floor Before Cleaning Edenbridge

Cleaning Dirty Terracotta Floor Tiles in Edenbridge

The first job was to remove the lacquer which I did with liberal amounts of Tile Doctor’s Remove and Go which is an alkaline coatings remover. A 50/50 dilution of product to water was applied and left to dwell for ten minutes. This was then agitated with a rotary floor buffer fitted with a silicon carbide brush and more water. The resultant slurry was then extracted with a wet vacuum.

Next was the hands and knees job of cleaning the wide grout lines that are typical feature of a Terracotta floor. I used a strong dilution of Tile Doctor Pro-Clean for this, again its left to soak in for ten minutes before being scrubbed in. This did the job of getting the grout clean and as I progressed the dirt was rinsed off and extracted again with the wet vacuum.

With the floor clean my attention turned to dealing with the efflorescence which was still present in the floor and would certainly re-appear as the floor dried. The solution is to counter the alkaline salts by giving the tiles an acid wash using Tile Doctor Acid Gel. The gel is applied to the floor and worked in with a black pad fitted to the rotary floor buffer. The gel is then rinsed off an extracted as before. As well as dealing with the efflorescence this product also neutralises the pH of the floor after the use of the alkaline cleaning products used earlier.

The floor was then mopped twice with just water and then dried as much as possible with the wet vacuum. The next step would be sealing so that’s all I could do on the first day so once done I left it to dry off.

Sealing a Terracotta Tiled Floor in Edenbridge

Terracotta is very porous, so instead of returning the next day to seal, as with many other stone types, I allowed an extra day. Applying sealer to a damp floor is not a good idea as the result can be patchy and inconsistent; with this in mind my first task of the day was to ensure the floor had dried sufficiently by taking several moisture readings with a damp meter.

The owner had already left for work that day but had given me a spare key, so I was able to let myself into the property. We had discussed sealing beforehand, and they had mentioned that they liked the appearance of the floor before the water leak and wanted a sealer that would give the same natural finish.

With this in mind, I sealed the Terracotta with Tile Doctor Ultra-Seal which is a modern impregnating sealer that is almost invisible and doesn’t change the appearance of the tile. Ultra-Seal is also breathable so any moisture and efflorescence still in the subfloor would be able to rise through the tile and evaporate at the surface without causing a problem.

Two liberal coats of sealer were applied to the Terracotta and Grout over a period of a few hours. I then hung around to ensure that I was satisfied with the dried finish and let myself out. The fresh sealer will protect the floor from dirt becoming ingrained in the tile keeping in on the surface where it can be easily mopped away.

Terracotta Kitchen Floor After Cleaning Edenbridge

For the regular cleaning of Terracotta tiled floors, I recommend the use of Tile Doctor Neutral Tile Cleaner which is an effective tile cleaner that is gentle enough not to compromise the newly applied sealant. Many household cleaning products are simply to strong for cleaning sealed floors and contain strong chemicals such as bleach that can break down a sealer.

Terracotta Kitchen Floor After Cleaning Edenbridge


Professional Renovation of an Efflorescent Salt Stained Terracotta Kitchen Floor in Kent

Efflorescent Salt Stained Terracotta Floor Renovated in Edenbridge Read More »

Quarry Tiled Kitchen Floor Renovated in Canterbury Kent

Renovating a Paint-Stained Quarry Tiled Kitchen Floor in Canterbury

This Quarry tiled floor at a property in Canterbury had sustained a lot of paint staining from the owner’s friend who had decorated the kitchen and toilet. The customer was a builder and realised how much work would it be to resolve the problem, especially without the correct tools and know how. So, he contacted Tile Doctor and I arranged to perform a survey.

Structurally the Quarry tiles were sound, but the straining was quite obvious, especially near the walls and there was also a section of tiles in the middle of the floor that had been replaced and didn’t quite blend in.

Quarry Tiled Floor Before Renovation Canterbury Quarry Tiled Floor Before Renovation Canterbury

I provided a quote for stripping the floor of the paint stains and remaining sealer and then resealing to give the whole floor a consistent appearance. Happy with my quote we scheduled a date for my return to renovate the floor.

Quarry Tiled Floor Before Renovation Canterbury Quarry Tiled Floor Before Renovation Canterbury

Removing Paint Staining from a Quarry Tiled Kitchen Floor

To tackle the paint stains and strip off the old sealer I put down in stages Tile Doctor’s Remove and Go which is a multi-purpose stripper formulated with a long dwell-time to remove most sealers, epoxy grout haze, adhesives and, most importantly, paint!

After leaving it to soak in for ten to fifteen minutes the Remove and Go had softened the paint marks enough for them to be removed with a black scrubbing pad. The pad is fitted to a rotary floor buffing machine adding water along the way to help lubricate the process. Once done the soil generated was vacuumed up and then repeated using an application of diluted Tile Doctor Pro-Clean, again the black scrubbing pad was used to lift out the last of the dirt in the tiles and further clean up the grout.

This process was repeated, and some areas spot treated until I was satisfied all the paint staining had been removed. Again, the resulting slurry and rinse water was removed using a wet vacuum before the floor was left to dry completely over the course of a few days.

Sealing a Quarry Tiled Kitchen and Utility Floor

Returning three days later, I took some moisture readings with a damp meter first. The readings were fine so satisfied that the tiles were sufficiently dry, I began applying what would be four coats of Tile Doctor Seal and Go Extra. This product was chosen for its nice low sheen finish that it gives to the floor.

Quarry Tiled Floor During Sealing Canterbury
As you can see from the photos, the paint staining has gone, the replacement tiles have blended in with the original and the whole floor looks much fresher. Needless to say the customer was very happy with the renovation.

Quarry Tiled Floor After Renovation Canterbury
Before leaving I took time to discuss how to look after the floor including the importance of not using an harsh tile cleaning products on the floor which can reduce the life of the sealer. For the regular cleaning of sealed Quarry tiles, I recommend Tile Doctor Neutral Cleaner.

Quarry Tiled Floor After Renovation Canterbury
 

Professional Renovation of a Quarry Tiled Kitchen and Utility in Kent

Renovating a Paint-Stained Quarry Tiled Kitchen Floor in Canterbury Read More »

Terracotta Floor Restoration Sandwich

Dirty Terracotta Floor Deep Cleaned and Sealed in Sandwich

I was called to a property in Sandwich, which is a few miles south of Margate, to look at renovating the Terracotta flooring in the kitchen, dining room and conservatory. The house was originally three cottages and close to the end of a project to convert them into one property.

Terracotta Floor Before Cleaning Sandwich Kent

The floor hadn’t been cleaned in years and the porous nature of the Terracotta tiles meant that the floor had taken on a lot of dirt. During my visit to the property, I carried out a small cleaning test on one of the tiles to show the client what they could expect by way of results. The test went well, and I was able to work out an accurate quote for the renovation. Happy with the test clean and my quote I was booked to do the work and we arranged a convenient date of my return.

Terracotta Floor Before Cleaning Sandwich Kent Terracotta Floor Before Cleaning Sandwich Kent

Sandwich is a beautiful historic part of Kent, it was one of the Cinque Ports and still retains many of its medieval buildings and older properties. As you may have suspected the town also gave the name to the food, we regularly tuck into courtesy of John Montagu who was the 4th Earl of Sandwich.

Cleaning Dirty Terracotta Floor Tiles in Sandwich

Working in sections I started with the application of a strong solution of Tile Doctor Pro-Clean which was left to soak into the tiles for roughly ten minutes. This was then worked into the Terracotta using a 400-grit burnishing pad fitted to a rotary buffer machine. The process generated a lot of red slurry which was vacuumed away using an industrial wet vacuum. The tiles were exceptionally dirty and more rinsing with water, and vacuuming was needed to remove all the soiling.

Terracotta Floor During Cleaning Sandwich Kent

The pad had struggled to reach into the pits of the tiles and recessed grout so for the next step I chose to fit a nylon wire attachment to the floor buffer and run it over the tiles and the especially the grout. This did the job and cleaned out the puts and the grout lines very well. The floor immediately looked significantly better.

Using fresh water with a weak solution of Tile Doctor Grout Clean Up, a mop and bucket the floor was given an acid wash to remove any old grout smears and neutralise any alkaline salts that could lead to efflorescence issues later. Once done the floor was rinsed with more water and the solution vacuumed off the floor. The floor was then left to dry for two days so it would be ready for the next step of sealing.

Sealing Old Terracotta Floor Tiles in Sandwich

Two days later I returned on schedule ready to apply a fresh sealer. I was concerned about the amount of water used during the cleaning process, so I started by checking the moisture level of the tiles with a damp meter.

I was happy with the readings so lost no time in applying the sealer. Three coats of Tile Doctor Colour Grow were applied which is an impregnating breathable sealer that soaks into the Terracotta occupying its pores and preventing dirt from residing there. This product contains a colour enhancing element that really brings out the colour in the Terracotta and being fully breathable it will be able to cope with any moisture rising through the tile which can be an issue with these old floors that don’t have a damp proof membrane.

Terracotta Floor After Cleaning Sandwich Kent

With a sealer now in place protecting the floor any dirt will remain on the surface where it can be easily mopped away. On that note I recommended the use of Tile Doctor Neutral Tile Cleaner for regular cleaning, this will ensure that the floor can be cleaned without compromising the newly applied sealant. Household cleaners tend to contain strong chemicals which will break down the seal prematurely.

Terracotta Floor After Cleaning Sandwich Kent

The client was very happy and left the following feedback, its short but he gets the message across.

‘Graham did an excellent job thank you’


Professional Restoration of a Terracotta Tiled Conservatory, Kitchen and Dining Room Floor in Kent

Dirty Terracotta Floor Deep Cleaned and Sealed in Sandwich Read More »

Victorian Conservatory Floor Birchington-on-Sea

Renovating a Stained Edwardian Conservatory floor in Birchington-on-Sea

This striking Victorian tiled Conservatory floor at a property Birchington-on-Sea was in good physical condition but had been stained with white salt deposits. Additionally, the old sealer on the Victorian tiles had worn down with use and now dirt was becoming trapped in the pores of the tile leaving it looking dull and un-inviting.

Victorian Tiled Conservatory Floor Before Cleaning Birchington-on-Sea

The salt deposit issue is often referred to as efflorescence and normally happens when the floor has no damp proof membrane to prevent moisture rising through the floor and evaporating at the surface. In this case however I suspect it was simply due to the over watering of plants, the water naturally contains salt and when the water evaporates it leaves the salt behind. The Southeast of England is known to be a Hard Water area which means it carries a high level of minerals including Calcium.

Victorian Tiled Conservatory Floor Before Cleaning Birchington-on-Sea

To renovate the Conservatory floor, I proposed giving it a deep clean to remove the dirt, efflorescence and what was left of the old sealer. Once clean and dry I would then apply a fresh sealer.

Removing Efflorescence from a Victorian Tiled Conservatory Floor

Upon my arrival at the house, my first task was to add protection to the skirting boards and adjacent wooden floors. I then created a strong dilution of Tile Doctor Pro-Clean, a versatile, high alkaline cleaner, this would get deep into the tiles and shift the dirt and grime along with the old sealer.

I applied the solution to the surface and left it to soak into the tile for twenty minutes, allowing it to get to work on breaking down the old sealer, staining and ingrained dirt. I then scrubbed this into the tiles using a Tile Doctor 200-grit burnishing pad fitted to a rotary floor machine. This process was repeated in a couple of areas that had the most stubborn stains. After the clean had been completed, I rinsed the entire floor several times and extracted the resulting slurry using a wet vacuum.

Sealing a Victorian Tiled Conservatory Hallway Floor

I left the floor overnight, allowing the floor enough time to dry and returned then next day to seal the floor, checking first to ensure the tiles had dried sufficiently with a damp meter.

To seal the floor, I applied several coatings of Tile Doctor Colour Grow allowing for thirty-minute drying time between each coat. I chose Colour Grow as it’s an impregnator that protects from within by occupying the pores in the tile thereby preventing dirt from becoming ingrained there. This product also contains a colour enhancing component that deepens the colour in the tile. Finally, it leaves a nice matt sheen appearance.

Victorian Tiled Conservatory Floor After Cleaning Birchington-on-Sea

As you can see from the before and after photos, the white salt stains were gone, and the tiles now have a very clean consistent appearance. The fresh seal should ensure it stays that way for some years to come.

My client was extremely pleased with my work and left the following positive feedback.

“Graham was very professional, he made a great job of our Edwardian tiles. I would recommend him.”

Victorian Tiled Conservatory Floor After Cleaning Birchington-on-Sea

For aftercare cleaning I recommended the use of Tile Doctor Neutral Tile Cleaner. This is a pH neutral cleaner, which will ensure the newly applied seal retains its integrity. Household cleaners are generally too strong for sealed surfaces and tend to break down the sealer prematurely taking the floor back to square one. Using the correct product will ensure the longevity of the new seal.


Professional Floor Renovation of an Edwardian Conservatory in North Kent

Renovating a Stained Edwardian Conservatory floor in Birchington-on-Sea Read More »

Scroll to Top