Canterbury Tile Cleaning

Canterbury Tile Cleaning

Welcome to my Work History archive where you will find examples of the cleaning and renovation of tiles carried out in Canterbury.

Quarry Tiled Kitchen Floor Renovated in Canterbury Kent

Renovating a Paint-Stained Quarry Tiled Kitchen Floor in Canterbury

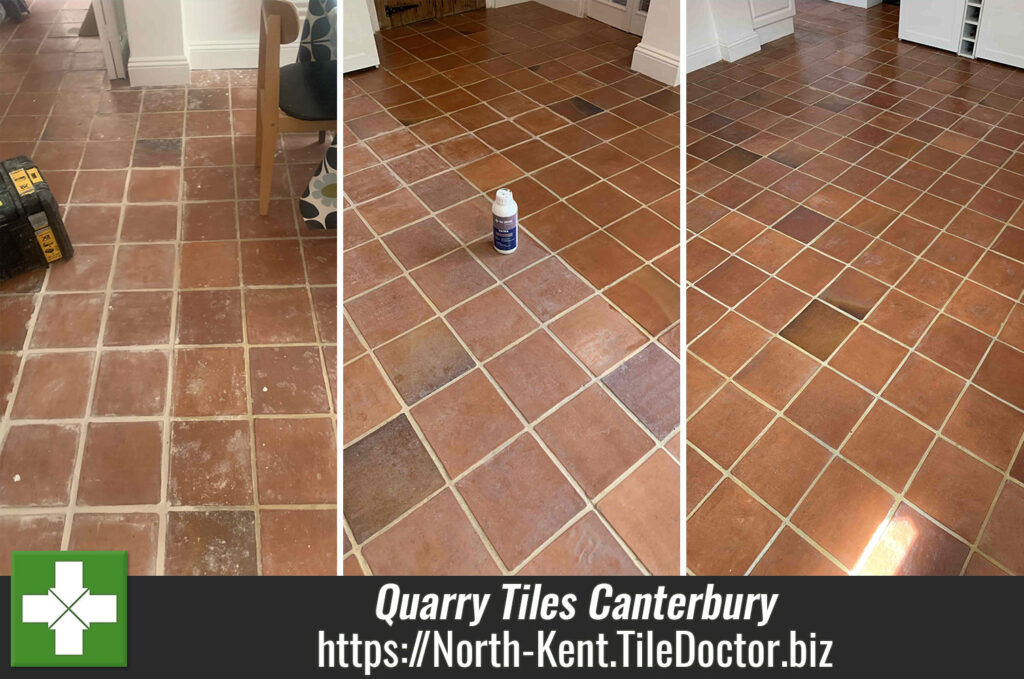
This Quarry tiled floor at a property in Canterbury had sustained a lot of paint staining from the owner’s friend who had decorated the kitchen and toilet. The customer was a builder and realised how much work would it be to resolve the problem, especially without the correct tools and know how. So, he contacted Tile Doctor and I arranged to perform a survey.

Structurally the Quarry tiles were sound, but the straining was quite obvious, especially near the walls and there was also a section of tiles in the middle of the floor that had been replaced and didn’t quite blend in.

Quarry Tiled Floor Before Renovation Canterbury Quarry Tiled Floor Before Renovation Canterbury

I provided a quote for stripping the floor of the paint stains and remaining sealer and then resealing to give the whole floor a consistent appearance. Happy with my quote we scheduled a date for my return to renovate the floor.

Quarry Tiled Floor Before Renovation Canterbury Quarry Tiled Floor Before Renovation Canterbury

Removing Paint Staining from a Quarry Tiled Kitchen Floor

To tackle the paint stains and strip off the old sealer I put down in stages Tile Doctor’s Remove and Go which is a multi-purpose stripper formulated with a long dwell-time to remove most sealers, epoxy grout haze, adhesives and, most importantly, paint!

After leaving it to soak in for ten to fifteen minutes the Remove and Go had softened the paint marks enough for them to be removed with a black scrubbing pad. The pad is fitted to a rotary floor buffing machine adding water along the way to help lubricate the process. Once done the soil generated was vacuumed up and then repeated using an application of diluted Tile Doctor Pro-Clean, again the black scrubbing pad was used to lift out the last of the dirt in the tiles and further clean up the grout.

This process was repeated, and some areas spot treated until I was satisfied all the paint staining had been removed. Again, the resulting slurry and rinse water was removed using a wet vacuum before the floor was left to dry completely over the course of a few days.

Sealing a Quarry Tiled Kitchen and Utility Floor

Returning three days later, I took some moisture readings with a damp meter first. The readings were fine so satisfied that the tiles were sufficiently dry, I began applying what would be four coats of Tile Doctor Seal and Go Extra. This product was chosen for its nice low sheen finish that it gives to the floor.

Quarry Tiled Floor During Sealing Canterbury
As you can see from the photos, the paint staining has gone, the replacement tiles have blended in with the original and the whole floor looks much fresher. Needless to say the customer was very happy with the renovation.

Quarry Tiled Floor After Renovation Canterbury
Before leaving I took time to discuss how to look after the floor including the importance of not using an harsh tile cleaning products on the floor which can reduce the life of the sealer. For the regular cleaning of sealed Quarry tiles, I recommend Tile Doctor Neutral Cleaner.

Quarry Tiled Floor After Renovation Canterbury
 

Professional Renovation of a Quarry Tiled Kitchen and Utility in Kent

Renovating a Paint-Stained Quarry Tiled Kitchen Floor in Canterbury Read More »

Victorian Hallway Floor Before After Restoration in Canterbury

Victorian Tiled Hallway Restoration in Canterbury Children’s Home

These pictures of a Victorian Tiled Hallway are from a property in Canterbury that was once a nursing home and was now being renovated to become a children’s home. The building was being gutted and extended at the same time and when the carpet was pulled up in the hallway, they were surprised to find a relatively intact Victorian tiled floor underneath.

Whilst they thought it bizarre that anyone would want to cover up such an attractive floor the carpet had protected it over the years. They realized it would make a marvellous feature at the entrance to the property, but professional restoration would be needed to do it justice. After a bit of research, they came across Tile Doctor and got in touch.

Canterbury comes under my North Kent designation, so I went to visit the property and survey the floor and quote for doing the restoration. There were a few missing and loose tiles that would need replacing and refixing also there was a lot of ingrained dirt so a deep clean and application of a new sealer would be required. I gave them a price for the work which they readily accepted, and we arranged a suitable time to carry out the work. Subject to the building schedule I had calculated the floor would take three days to restore.

Victorian Hallway  Canterbury During Renovation

Repairing and Removing Adhesive from a Victorian Tiled Hallway Floor

On the first day I set about replacing and re-fixing the missing, broken, and loose tiles. This is delicate work as you need to extract the old tile without disturbing its neighbours and then clean up the area ready for its replacement. Being a Tile Doctor I keep a selection of stock tiles for repairs, some are reclaimed, and some are replica. Also, there are several companies still making Victorian style tiles so I can usually source what I need.

After the individual missing and broken tiles had been replaced and the adhesive had set, it was then a matter of renovating the floor as a whole. The tiles were covered in a thick layer of carpet adhesive which needed a combination of specialist tools and products to remove. First, a liberal layer of Tile Doctor Remove and Go was applied and left to dwell for thirty minutes. Next, Tile Doctor Pro-Clean was added and scrubbed in with a black pad.

This process softened the adhesive sufficiently in readiness for the next stage which involves using a set of diamond burnishing pads on a weighted buffing machine. Several applications were needed, each time with a successively finer grade of diamond pad and rinsing off the slurry in between. The tiles were first milled using a very coarse 50-grit pad, followed by 100, 200 and finally burnished with a 400-grit burnishing pads. This removed all the adhesive and dirt in the tiles, which was cleaned up using the wet vacuum.

Old Victorian floors like this do not have a damp proof membrane installed under the floor, and with a lot of water being used in the cleaning process I was concerned White efflorescence salts could appear later as the floor dried. To counter this, I gave the floor an acid wash using Tile Doctor Acid Gel to counter and dissolve the salts, it also gives the tiles another clean and will remove any old grout smears further improving the appearance of the tiles. Once done the floor was left to dry overnight.

Sealing a Victorian Tiled Hallway Floor

On my return I tested the floor was dry by taking several moisture readings around the floor with a damp meter. Applying sealer to a damp floor is never advised and can lead to clouding and an unwanted finish.

Happy that the tiles were dry, a single coat of Tile Doctor Colour Grow sealer was applied. This is an impregnating sealer with a colour enhancing component to ‘lift’ the stronger colours of the floor. Colour Grow however does leave a matt appearance and as the client had asked for a shiny finish it was topped up with five coats of Tile Doctor Seal and Go. This is a compatible topical sealer which added a mid to high sheen.

Victorian Hallway  Canterbury After Renovation

By the end of the third day the Victorian floor looked brand new, and I received the following feedback from the client. Its rare to receive feedback from commercial customers so they were clearly overwhelmed with the transformation.

Did not think this glued covered bad old floor could look sooooo good Fabulous Fantastic job Looks Amazing Thank you

For aftercare I recommend the use of Tile Doctor Neutral Cleaner which isn’t as harsh as many of the products you find in supermarket. Stronger products can actually strip off the sealer over time leaving it vulnerable to dirt and detracting from its appearance.


Professional Restoration of a Victorian Tiled Hallway in North Kent

Victorian Tiled Hallway Restoration in Canterbury Children’s Home Read More »

Saltillo Terracotta Tiles Floor Before After Renovation Canterbury

Wax Sealed Saltillo Terracotta Hallway Floor Renovation in Canterbury

Earlier this year I went to visit a property in Canterbury to look at restoring a Terracotta tiled floor. The floor was approximately 11m2 and made from the larger Saltillo type Terracotta tiles. It had been in situ for some time and being located in the hallway it was subject to the heavy foot traffic of a busy household.

Having taken a closer look at the Terracotta tiles I could see there were many high spots due to poor installation by the original tiler, on top of that it had then been sealed with linseed oil followed by a wax paste. Wax was traditionally used to seal Terracotta floors, but it scratches easily and can lead to a thick build-up. Since the introduction of modern sealers designed for the job, we don’t recommend wax treatments anymore.

Saltillo Terracotta Hallway Floor Before Renovation Canterbury Saltillo Terracotta Hallway Floor Before Renovation Canterbury

We discussed the process to renovate the floor, explaining that the best course of action would be to use milling pads to level the surface of the tiles which would improve the finish and remove the built-up wax. Once prepared in this way the floor would be sealed to protect it going forward. They were happy with my quotation and we agreed a date to return and complete the work.

Renovating a Terracotta Tiled Hallway Floor

The use of Milling pads can generate a lot of slurry to our first task was to protect the surrounding areas using protective sheeting. The area was quite tight to work in, so we used the smaller six-inch milling pads which are encrusted with coarse industrial diamonds. The pads we fitted to a handheld buffer and worked over the tiles gradually increasing the pads from coarse to finer grits. The machine we use has a water feed that keeps the surface lubricated and this also helps to reduce the dust. The fine slurry generated using this process is rinsed off and extracted with a wet vacuum.

The next step was to remove the old wax the floor had been treated with a dilution of Tile Doctor Wax Away which is designed for exactly this purpose. Its applied to the floor and then scrubbed in using a slow speed rotary machine. Afterwards the floor is rinsed with water several times and the waste removed with the wet vacuum. By the time we had finished that day we could see a big improvement in the floor surface. After the final rinse the floor was left to dry off overnight.

Sealing a Terracotta Tiled Hallway Floor

I came back the following day and using the moisture meter checked that the floor was dry. It was well within the accepted parameters, so I was ready to apply the seal.

To seal the Terracotta, I had selected to use Tile Doctor Colour Grow, this is a modern durable sealer that provides long lasting protection and ideal for busy hallways. Colour grow also also enhances the natural red and orange colours in the Terracotta leaving a nice subtle finish. Three coats of Tile Doctor Colour Grow were applied.

Saltillo Terracotta Hallway Floor After Renovation Canterbury Saltillo Terracotta Hallway Floor After Renovation Canterbury

The photographs I took don’t show the difference in the floor that well, however my customer was very happy with the improvement in the floor and glad that the potential trip hazard has been resolved.


Professional Restoration of a Terracotta Tiled Hallway in East Kent

Wax Sealed Saltillo Terracotta Hallway Floor Renovation in Canterbury Read More »

Limestone Tiled Pool Surround Repairing and Cleaning Canterbury

Limestone Swimming Pool Tiles Repaired and Polished in Canterbury

This was meant to be a relatively straightforward clean and polish of the Limestone tiles surrounding a swimming pool at a large house on the outskirts of Canterbury. However, after visiting the property to survey the installation I discovered that a lot of the tiling around the edge of the pool was loose and water was getting in underneath.

I discussed the problem with the owner and concerned about health safety he asked me to remove the affected tiles and refit them securely. The Limestone tiles were also stained due to the chemicals in the pool however I already had a plan to burnish the stone tiles to resolve that problem. We agreed a date for the work and the owner agreed to have the pool drained in order to make the tiling work much easier.

Re-Tiling a Loose Limestone Swimming Pool Surround

I returned to the property on the agreed date and started by setting up some scaffolding and adding plastic sheeting to the pool to protect the tiling. The next step was to tackle the loose Limestone which is when I discovered that the tiles had only been secured in a few places with what could best be described as blogs of tile adhesive which left a large cavity for water to sit. This practice is often referred to in the tiling trade as “Dot and Dab” and very much frowned upon. The tiles should have been fully bonded onto a layer of adhesive that had been spread with a notched trowel to form a very secure bond and ensure water could not seep underneath.

Limestone Swimming Pool Tile Surround Dot and Dab Canterbury

TIP: If you want to check your tiling to see if it has been “Dot and Dabbed” then tap the tiles with the end of a wooden broom handle, it should sound dull throughout, if the tapping sounds hollow in certain areas then this indicates Dot and Dabbing.

The remedy was to lift all the affected limestone edging including the dabbed adhesive and then allow the affected area to dry out thoroughly. I then returned two weeks later to level off the surface with a water proof screed before re-installing the tiles. The tile adhesive and grout needed to be dry before the next stage of cleaning so once I had completed this step, I used the rest of the day to clean up and removing the plastic sheeting and scaffolding.

Limestone Swimming Pool Tile Surround Repair Canterbury

Deep Cleaning Stained Limestone Tiles

On the next day I checked my previous work was secure and then set about cleaning the floor with a set of Diamond burnishing pads. You start with the application of a coarse 400-grit pad, then move onto medium 800-grit pad, fine 1500-grit pad and finishing with the extra fine 3000-grit pad.

The pads are fitted to a rotary floor buffer and are run over each tile using water for lubrication. The floor is rinsed between the application of each pad so the fine slurry produced can be extracted using a wet vacuum. Fortunately, due to the pool being emptied I didn’t have to worry too much about contaminating the pool water.

The pads made a big difference to the stained Limestone and really brought out the best in the them. Once the pool had been refilled the whole scene looked amazing, I just wished I taken more pictures.

Limestone Swimming Pool Tile Surround After Repair and Clean Canterbury


Professional Restoration of a Limestone Flooring in Kent

Limestone Swimming Pool Tiles Repaired and Polished in Canterbury Read More »

=================================

North Kent Tile Doctor

================================= Read More »

Scroll to Top