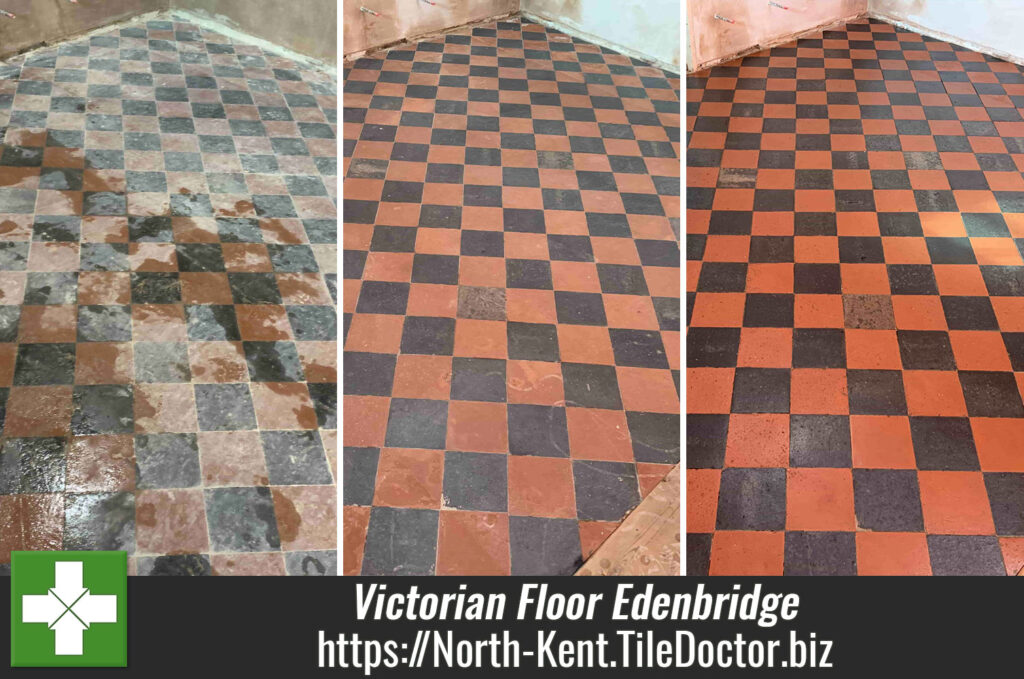
100 Year Old Red and Black Victorian Tiled Floor Restored in Edenbridge
I was recently asked to renovate a Red and Black Tiled floor at a Victorian era house near Edenbridge. The property had recently been purchased and the new owner was performing a complete makeover before he and his wife moved in.

The tiled floor in question in the building site was to be the Kitchen floor. It was a heavily soiled however the good news was that the tiles themselves were in good physical condition. They were thick tiles at approximately 18mm deep and this undoubtedly contributed to them withstanding the rigours of time. I worked out a comprehensive price for the restoration, submitted the quote and was awarded the work.

Deep Cleaning a Red and Black Victorian Tiled Floor
This was a two-day job and the first day was all about the clean. Upon arrival, and fearing drying issues, I organised for heaters and a dehumidifier to be supplied. Old floors like these don’t have the benefit of a damp proof membrane under the floor so can take much longer to dry out.
With plenty of water and a strong solution of Tile Doctor Pro-Clean, a powerful alkaline cleaner, I worked them in with a Carbide brush attached to the big buffer. This gave a good initial clean and the brush was able to flex into the pits of the 100-year-old worn tiles. The resultant slurry was removed with a wet vacuum as I went. Then, it was a hands and knees job with the rotary with a smaller brush attachment to get right up to the edges and into the corners.

The floor has some remnants of cement remaining which I removed with a chisel as I went along. I then changed the brush attachment on the big buffer for a 400-grit burnishing pad and repeated the process, giving the floor a 2nd treatment, followed by hands and knees and a six-inch version of the same pad.
Another issue I had to deal with were old paint marks which were spot treated with Tile Doctor Remove and Go. The last thing to do was neutralise the alkalinity of the floor after using Pro-Clean with an acid wash using Tile Doctor Grout Clean-Up. This was mopped onto the floor and then rinsed off.
Normally, with newer floors, I would return the next day to seal the tiles but given my concerns over the floor conditions and thickness of the tiles, I felt more time was needed. The tiles needed to fully dry with the aid of the heaters and dehumidifier.
Sealing a 100-Year-Old Victorian Tiled Floor
Two days later, I returned and took damp readings from several areas using a moisture meter. This showed the tiles were dry enough but my more immediate issue was the prolific efflorescence that had appeared. Efflorescence can occur when wet tiles dry and soluble salts come to the surface as a white foam and dry as a White salt.

I consider this to be a good thing, as if it is going to happen then you want it to happen on your terms. i.e. before the sealing process starts. A very hot bucket of water and a wrung-out mop with another dose of Grout Clean-Up shifted the efflorescence and left the floor to dry for a while to allow the tiles to dry again.
Later, more moisture tests proved the floor was ready to be sealed and I was able to make a start on sealing the tiles. For this type of tile and situation, my strong preference is Tile Doctor’s X-Tra Seal, an oil-based, impregnator sealer which is formulated with a colour intensifier. Additionally, this sealer is fully breathable so any moisture will rise through the tile and evaporate at the surface un-hindered. I applied one liberal coat, allowed it to soak in and buffed off the excess with a White pad and allowed the floor to dry once again.
I then returned to apply a very thin second layer and buffed that off, too. The colour intensifier ensured that the black became blacker and red tiles a deeper red resulting in a very satisfying finish!

With the job done, I left the premises having texted the owner photos of the finished floor. Later, I got the following response:
For aftercare cleaning of Victorian tiles I recommend the use of Neutral Tile Cleaner which is designed for the maintenance of sealed floor tiles.

Professional Cleaning of a Victorian Tiled Floor in North Kent
100 Year Old Red and Black Victorian Tiled Floor Restored in Edenbridge Read More »