Burnishing Pads

Travertine Tiled Kitchen Floor Renovation Leeds Village

Large Travertine Floor Cleaned and Polished in Leeds Village

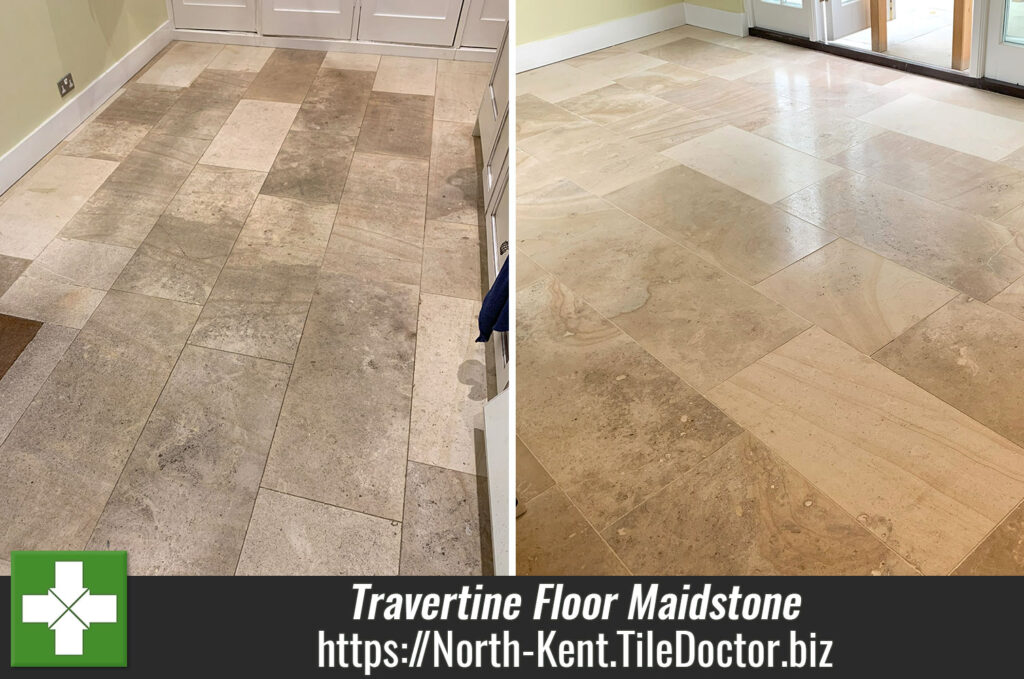
I was contacted about a Georgian property in the Kent village of Leeds , to see if I could do anything to improve a Travertine tiled floor. The use of Travertine was extensive and had been installed throughout the ground floor including the kitchen, dining room, utility and bathroom WC. Travertine is probably my favourite stone, but it is acid sensitive and attracts dirt easily, due to its ‘holey’ composition.

Travertine Tiled Floor Before Cleaning Leeds Village

Initially we discussed the floor over the phone where I got to know about the issues they were experiencing, and I detailed the renovation process I normally use to restore it including the products and timelines. Naturally they wanted to me to provide a quote for the work however its tricky to do that accurately without seeing the floor, so I arranged a date to pop over.

Travertine Tiled Kitchen Floor Before Cleaning Leeds Village Travertine Tiled Floor Before Cleaning Leeds Village

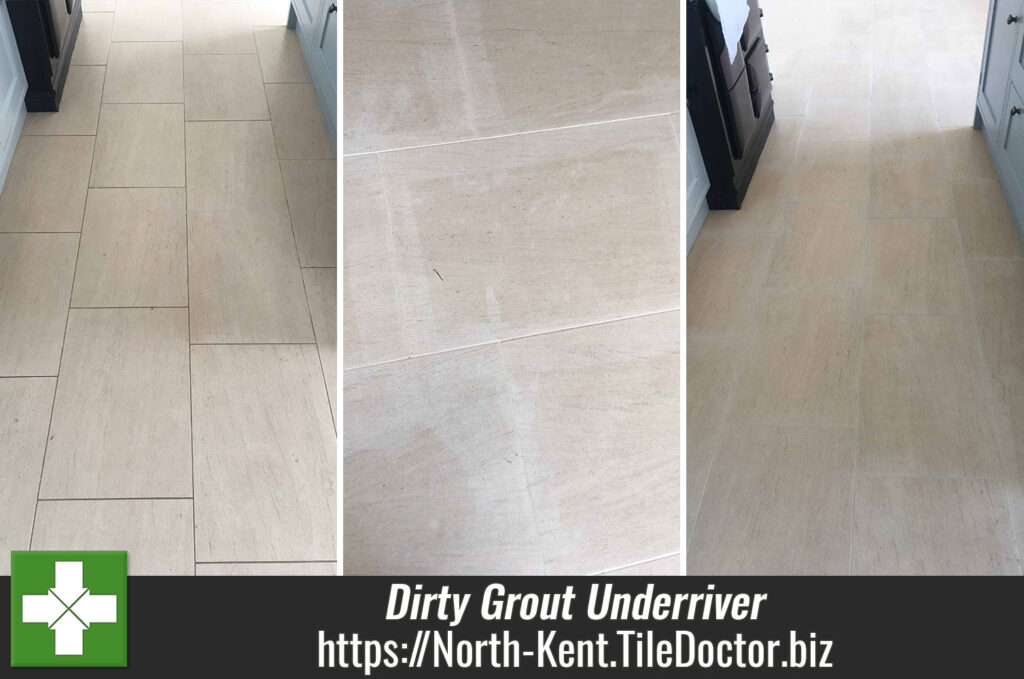
Upon arriving I could see the tiles and the wide grout joints had extensive, ingrained dirt indicating the previous sealer had long since worn away. This is a common issue with stone floors, and to re-assure myself and the client it could be resolved I cleaned a small area in the utility room with pleasing results!

Travertine Tiled Utility Floor Test Clean Leeds Village

This test clean helped me to understand which products and methods would work best on the floor and later that day I emailed over a detailed quote for the renovation. Happy with the quote I received a reply the same day asking when I could start.

Deep Cleaning Travertine Tiled Flooring

My colleague and I arrived on the agreed date and work started with adding protection to all areas that required it. We use a lot of water during the cleaning process and some materials such as MDF can become damaged with water ingress, so it makes sense to do this.

To get the floor clean, a coarse Carbide Brush fitted to a rotary machine was run over the Travertine tiles to scrub in a strong solution of Tile Doctor Pro-Clean. This process generates a lot of slurry as the dirt was washed out of the stone and grout which is extracted with a wet vacuum as we progressed.

Next it was on hands and knees with more Tile Doctor Pro-Clean and handheld brushes run over stubborn areas and along the grout lines to take them from 80% up to 100%.

Happy with the results, the next step was to renovate the stone using a series of diamond encrusted burnishing pads. Using only water for lubrication this process starts with the application of a coarse 400-grit burnishing pad attached to the floor buffer. This produces a lot of slurry which again was removed with a wet vacuum.

This left the Travertine clean, but the pores of the stone had been opened giving the floor a matt finish and more absorbent than it was originally. To further refine the appearance of the stone the next two burnishing pads were applied which are 800 and 1500-grit. These pads polish the stone and close the pores, restoring the natural sheen in the process. After each pad was applied the slurry was rinsed off the floor with water and extracted with the wet vacuum. Once complete the floor was left to dry off fully overnight.

Sealing a Travertine Tiled Utility, Kitchen, and WC

I arrived the next day and took several moisture readings from the floor to check that it had dried off sufficiently overnight. The results were good, so work moved onto sealing the Travertine with two coats of Tile Doctor Ultra Seal which is a natural look impregnating sealer. It works by soaking into the stone, occupying the pores and thereby preventing dirt from becoming ingrained there. This ensures dirt remains on the surface where it is easily cleaned away.

Travertine Tiled Floor During Sealing Leeds Village

The final step in the floor’s renovation was to apply the last of the diamond polishing pads which is a very fine 3000-grit. This pad further improves the polished appearance of the stone resulting in a satisfying sheen.

Travertine Tiled Kitchen Floor After Cleaning Sealing Leeds Village Travertine Tiled Utility Floor After Cleaning Sealing Leeds Village

The work made a massive difference to the floor, and I received an email the next day from one of the owners who was really pleased with the transformation:

”Floors look brilliant. Very pleased.”

Travertine Tiled Floor After Cleaning Sealing Leeds Village

For the care and maintenance of polished sealed floors I recommend the use of Tile Doctor’s Stone Soap which is a gentle but effective cleaning product that won’t impact the sealer and contains a patina enhancer. When it comes to sealed floors my mantra is:

“If you look after the sealer, the sealer will look after the floor!”


Professional Renovation and Polishing of a Travertine Tiled Floor in Kent

Large Travertine Floor Cleaned and Polished in Leeds Village Read More »

Pitted Travertine Floor Renovation Maidstone

Multiple Travertine Tiled Floors Renovated in Maidstone

I was recently asked to survey a large Travertine tile installation at a 300-year-old thatched cottage in Maidstone. The Travertine floor was installed throughout the downstairs including the kitchen, dining room and utility room.

Travertine Floor Before Cleaning Maidstone

The stone floor had not been sealed in years and the previous sealer had now worn off with use leading to accumulated ground-in dirt. They were also concerned about numerous cracks that had appeared in the tiles, presumably from the underfloor heating.

Travertine Floor Before Cleaning Maidstone Travertine Floor Before Cleaning Maidstone

Travertine is a type of limestone that is acid sensitive and is naturally ‘holey’ or pitted. These pits are usually filled by the manufacturer but this can come loose and more holes can develop over time especially if you use an acidic bleach-based cleaning product.

Travertine Floor Before Cleaning Maidstone

I performed a survey and worked out a renovation plan and quote. Happy with the quote we agreed a date for the work to start.

Filling and Cleaning Travertine Floors in Maidstone

The first job was to clean the cracks and holes in the Travertine before they could be repaired with a filler. This was done with a rotary floor machine fitted with a carbide brush in conjunction with water and Tile Doctor Pro-Clean which is an effect alkaline tile and grout cleaner. The work was performed in stages and the resultant dirty water was removed with a wet vacuum as we worked.

The floor was then inspected and the grout lines, cracks and larger holes were individually scrubbed by hand with a stronger Pro-Clean solution. Interestingly the grout lines cleaned up well to reveal they were a Jasmine colour that wasn’t evident before.

A heat gun was then used to dry the cracks and holes before applying a specialist stone resin sold for exactly this purpose. Once dry it was then sanded down so the filler was flush with the surface of the Travertine.

Next, a set of diamond burnishing pads were applied to the stone floor with using water for lubrication. There are four pads in the set with grits from 400 to 3000, each diamond pad is fitted to the buffer in turn. The pads are slowly passed over each Travertine tiles, first lengthways and then widthways ensuring a good and consistent cut. The resultant slurry is then extracted as before with the wet vacuum. Each successive pad had a finer grit of diamond which closes the pores of the stone and starts to put the natural sheen back.

A final mop and then we left for the day to allow the tiles to dry out to be sealed the next day.

h2>Sealing Travertine Tiled Floors in Maidstone

Returning the next day the first task was to check the moisture readings of the floor using a damp meter. The readings were good and it confirmed the floor was dry and ready for sealing. This check is really important as applying a sealer to a damp floor would impact its ability to cure and result in it looking patchy.

Happy with the readings from the moisture meter the floor was sealed with two coats of Tile Doctor’s Ultra Seal a natural look, impregnator. The sealer soaks into the pores of the stone protecting it from within and without altering the natural appearance of the honed stone.

Travertine Floor After Renovation Maidstone Travertine Floor After Renovation Maidstone

A final polish with a fine 3000-grit diamond pad left the floors with an attractive reflective sheen and a happy customer!

Travertine Floor After Renovation Maidstone

Before leaving I took time to discuss aftercare cleaning which for a polished stone floor like this, I recommend the use of Tile Doctor Stone Soap which is a gentle cleaning product that won’t impact the sealer and will maintain the patina.

Travertine Floor After Renovation Maidstone


Professional Renovation of Travertine Tiled Flooring in Kent

Multiple Travertine Tiled Floors Renovated in Maidstone Read More »

Red Black Victorian Tiled Floor Restoration Edenbridge

100 Year Old Red and Black Victorian Tiled Floor Restored in Edenbridge

I was recently asked to renovate a Red and Black Tiled floor at a Victorian era house near Edenbridge. The property had recently been purchased and the new owner was performing a complete makeover before he and his wife moved in.

Red Black Victorian Tiled Floor Before Cleaning Edenbridge

The tiled floor in question in the building site was to be the Kitchen floor. It was a heavily soiled however the good news was that the tiles themselves were in good physical condition. They were thick tiles at approximately 18mm deep and this undoubtedly contributed to them withstanding the rigours of time. I worked out a comprehensive price for the restoration, submitted the quote and was awarded the work.

Red Black Victorian Tiled Floor Before Cleaning Edenbridge

Deep Cleaning a Red and Black Victorian Tiled Floor

This was a two-day job and the first day was all about the clean. Upon arrival, and fearing drying issues, I organised for heaters and a dehumidifier to be supplied. Old floors like these don’t have the benefit of a damp proof membrane under the floor so can take much longer to dry out.

With plenty of water and a strong solution of Tile Doctor Pro-Clean, a powerful alkaline cleaner, I worked them in with a Carbide brush attached to the big buffer. This gave a good initial clean and the brush was able to flex into the pits of the 100-year-old worn tiles. The resultant slurry was removed with a wet vacuum as I went. Then, it was a hands and knees job with the rotary with a smaller brush attachment to get right up to the edges and into the corners.

Red Black Victorian Tiled Floor During Cleaning Edenbridge

The floor has some remnants of cement remaining which I removed with a chisel as I went along. I then changed the brush attachment on the big buffer for a 400-grit burnishing pad and repeated the process, giving the floor a 2nd treatment, followed by hands and knees and a six-inch version of the same pad.

Another issue I had to deal with were old paint marks which were spot treated with Tile Doctor Remove and Go. The last thing to do was neutralise the alkalinity of the floor after using Pro-Clean with an acid wash using Tile Doctor Grout Clean-Up. This was mopped onto the floor and then rinsed off.

Normally, with newer floors, I would return the next day to seal the tiles but given my concerns over the floor conditions and thickness of the tiles, I felt more time was needed. The tiles needed to fully dry with the aid of the heaters and dehumidifier.

Sealing a 100-Year-Old Victorian Tiled Floor

Two days later, I returned and took damp readings from several areas using a moisture meter. This showed the tiles were dry enough but my more immediate issue was the prolific efflorescence that had appeared. Efflorescence can occur when wet tiles dry and soluble salts come to the surface as a white foam and dry as a White salt.

Red Black Victorian Tiled Floor During Efflorescence Cleaning Edenbridge

I consider this to be a good thing, as if it is going to happen then you want it to happen on your terms. i.e. before the sealing process starts. A very hot bucket of water and a wrung-out mop with another dose of Grout Clean-Up shifted the efflorescence and left the floor to dry for a while to allow the tiles to dry again.

Later, more moisture tests proved the floor was ready to be sealed and I was able to make a start on sealing the tiles. For this type of tile and situation, my strong preference is Tile Doctor’s X-Tra Seal, an oil-based, impregnator sealer which is formulated with a colour intensifier. Additionally, this sealer is fully breathable so any moisture will rise through the tile and evaporate at the surface un-hindered. I applied one liberal coat, allowed it to soak in and buffed off the excess with a White pad and allowed the floor to dry once again.

I then returned to apply a very thin second layer and buffed that off, too. The colour intensifier ensured that the black became blacker and red tiles a deeper red resulting in a very satisfying finish!

Red Black Victorian Tiled Floor After Cleaning Edenbridge

With the job done, I left the premises having texted the owner photos of the finished floor. Later, I got the following response:

“Just went and had a look. Really pleased with it thanks.”

For aftercare cleaning of Victorian tiles I recommend the use of Neutral Tile Cleaner which is designed for the maintenance of sealed floor tiles.

Red Black Victorian Tiled Floor After Cleaning Edenbridge


Professional Cleaning of a Victorian Tiled Floor in North Kent

100 Year Old Red and Black Victorian Tiled Floor Restored in Edenbridge Read More »

Flagstone Basement Pub Floor After Renovation Chatham

Renovating a Flagstone Floor at an 18th Century Public House in Chatham

I received a request to quote for renovating a large flagstone floor in the basement of Command House pub in Chatham. The company that engaged us had been performing a major refit of the Grade II listed building and the basement was next in line for renovation.

The building dates to the 18th century and being part of the famous Chatham Dockyard had a long military history and was no doubt visited by Lord Nelson. At some point in the 20th century, it was converted into a public house. The 70sqm basement was to be a feature of the pub but the flagstone floor had been neglected for seemingly most of its life and we were tasked with getting the best out of it that it could offer.

Flagstone Basement Pub Floor Before Cleaning Chatham Flagstone Basement Pub Floor Before Cleaning Chatham

Having inspected the floor I conducted a few cleaning tests and provided a quotation for its renovation which would include a deep cleaning of the flagstones and mortar and sealing with a hard-wearing sealer. Happy with my quote I was asked to go ahead with the work and a date set to start the renovation.

Flagstone Basement Pub Floor Before Cleaning Chatham

Cleaning a Neglected Flagstone Basement Floor in Chatham

Work started with the application of a strong dilution of Tile Doctor Pro-Clean which is our go to alkaline Tile and Grout cleaner. This was left to soak in for ten minutes before being worked in using a set of diamond encrusted burnishing pads fitted to a weighed floor buffer.

Flagstone Basement Pub Floor During Cleaning Chatham Flagstone Basement Pub Floor During Cleaning Chatham

You start with a coarse 400-grit pad lubricating with water as the pad is passed over each part of the stone floor three to four times, the soiling is then rinsed off the floor and extracted with a wet vacuum and you move onto the next pad in the sequence i.e., 800, then 1500 grit. Due to the rough nature of the flagstone and the sheer size of the basement meant that 4 sets of pads were needed to loosen and remove the years of dirt.

Last step of the cleaning phase was to give the stone an acid wash using a weak dilution of Tile Doctor Grout Clean-Up. This was done to neutralise the pH level of the floor after the use of the alkaline cleaner, it will also counter any efflorescent salts lurking in the stone which can be a problem with old floors like this that were laid without a damp proof membrane.

It took two of us working together a full day to complete the cleaning but by the end of the day the whole floor was cleaned and prepped for the next step which would involve applying a sealer to the stone. Happy with our progress, we left for the day for the floor to settle and dry for the sealing process.

Sealing a Flagstone Basement Floor in Chatham

Upon our return, we performed multiple point moisture tests around the basement. A lot of water had been used in the cleaning process and we were conscious that we were below ground and very near the Medway River.

Happy that all was in order, work proceeded to seal the floor with Tile Doctor X-Tra Seal which is a hard-wearing oil-based sealer that puts the life back in the stone. This sealer is known as an impregnator which works by soaking into the pores of the stone occupying the space and preventing dirt from residing there in future. This product it is also a breathable sealer that can be used externally and so more than capable of dealing with any damp issues which may occur later.

Flagstone Basement Pub Floor After Renovation Chatham

It was a very satisfying job as the colours that came through from the once very grey and lifeless floor really gave the room a new perspective. It will be interesting to see what they do next with it.

Flagstone Basement Pub Floor After Renovation Chatham


Professional Renovation of an Old Flagstone Basement Floor in Kent

Renovating a Flagstone Floor at an 18th Century Public House in Chatham Read More »

Blue Travertine Kitchen Floor Tiles Renovated in Sandwich Kent

Blue Travertine Tiled Kitchen Floor Renovated in Sandwich

This client from Sandwich had a Blue Travertine floor in their kitchen which is not as common as its ‘Yellow’ cousin but certainly more interesting to look it. It does however have the same maintenance requirements and unless the sealer is maintained will trap dirt. This happens very gradually over many years until one day you look down at the floor and think, ‘How did that happen?!’

Blue Travertine Kitchen Floor Tiles Before Cleaning Sandwich

I visited the property to conduct a free survey of the floor and assured the client that the appearance of their unique Blue Travertine floor could be restored with a deep clean, polish and fresh sealer. I explained the renovation plan and the costs involved which they were happy to accept and a date agreed for the work to start.

Cleaning a Travertine Tiled Kitchen and Utility Floor

On day 1 work started with cleaning the grout lines using Tile Doctor Pro-Clean which is a strong industrial strength alkaline cleaner. Its applied to the grout lines, left to soak in for a while and then scrubbed in using a stiff brush by hand. This process lifts the dirt from the grout line into the solution and then extracted from the surface using a wet vacuum.

Next, a 400-grit diamond burnishing pad was applied to the stone floor with using water for lubrication. This is the first step in the honing and polishing process that will remove the ingrained dirt and restore the polished appearance of the Travertine. This was followed by the 800 and then 1500 grit burnishing pads, slowly cleaning and re-building the polish. In between each pad the soiling was extracted with the wet vacuum.

Blue Travertine Kitchen Floor Tiles During Cleaning Sandwich

Once done, it was as far as we could do for the day and we left, allowing the tiles to dry overnight.

Sealing a Travertine Tiled Kitchen and Utility Floor

Returning the next morning work began by checking the moisture readings of the floor using a damp meter. The readings were good and it confirmed the floor was dry and ready for sealing. This check is really important as applying a sealer to a damp floor would impact its ability to cure and result in it looking patchy.

Before applying the sealer, I ran a very fine 3000-grit burnishing pad over the floor to further bring up its polished appearance. This is applied with a small amount of water sprayed onto the tile using a process know as a Spray Burnish. This really finishes off the honing process and by now the floor had a good sheen to it.

The sealer of choice was Tile Doctor’s Ultra Seal a natural look, impregnator that soaks into the pores of the tile protecting it from with and without altering the natural appearance of the honed stone. Two coats were applied and a final buff with a White pad left the kitchen floor looking like you could eat your dinner off it!

Blue Travertine Kitchen Floor Tiles After Renovation Sandwich

My client was very happy with their difference I had made to the Blue Travertine tiles which really looked like they had just been installed.

Lovely guy that came out, arrive in time and kept me informed of progress of the job.do not hesitate to use Tile Doctor.

Before leaving I took time to discuss aftercare cleaning which for a polished stone floor like this, I recommend the use of Tile Doctor Stone Soap which is a gentle cleaning product that won’t impact the sealer and will maintain the patina.


Professional Restoration of a Blue Travertine Tiled Kitchen Floor in Kent

Blue Travertine Tiled Kitchen Floor Renovated in Sandwich Read More »

Limestone Floor Tile and Grout Renovation Underriver

Limestone Floor with Dirty Grout Renovated in Underriver, Sevenoaks

I was asked to survey a Limestone floor at a property in Underriver which is a very rural locality close to Sevenoaks in Kent. The Limestone tiles had been laid throughout the lower ground floor and it was clear to me that the protective sealer had worn off completely allowing dirt to become ingrained in the stone and especially the grout which had turned black.

Limestone Floor Tile and Grout Before Cleaning in Underriver Sevenoaks

I understood from the owner that the grout lines should have been a pale cream colour rather than the black it was now. We discussed the process of restoring the floor including the grout, and I gave them a quote for the work which they were happy to accept.

Limestone Floor Tile and Grout Before Cleaning in Underriver Sevenoaks

Cleaning a Limestone Tiled Ground Floor

Our first job was to tackle the severe soiling in the grout lines. To do this a strong dilution of Tile Doctor Pro-Clean was applied to the floor and left to soak into the stone and especially the grout for about 20 minutes. This was scrubbed in with help from a rotary buffer machine fitted with a soft/medium long-bristled nylon brush.

Limestone Floor Tile and Grout During Cleaning in Underriver Sevenoaks

The resulting slurry was then rinsed with clean water and vacuumed up. I repeated the process in a couple of areas that were particularly heavily soiled. I then spot checked the grout lines and completed the clean with a wire brush and more Tile Doctor Pro-Clean.

Limestone Floor Tile and Grout During Cleaning in Underriver Sevenoaks

With the grout issue resolved I turned my attention to the Limestone tiles for which I used a set of Diamond burnishing pads. Work started with a coarse 400-grit 17” diamond pad fitted to a rotary buffing machine. Then 800 and 1500 grit pads in sequence using water to lubricate the process. The resulting slurry was rinsed off the floor with water after each pad and the soil extracted using a wet vacuum. The floor was then left to dry thoroughly overnight.

Sealing a Limestone Tiled Ground Floor

Returning the next day, the floor was thoroughly vacuumed removed to remove any remaining powder and grit left over from burnishing. This was then followed by applying the last pad in the set which is very fine 3000-grit diamond polishing pad. This last pad really brings up the polished appearance of the limestone, only a little water is used during this action, it’s a process we call a spray burnish. Once done the floor was clean, dry, and ready for a new sealer to be applied.

I had discussed the appearance of different sealers with the customer previously and for this installation we went with Tile Doctor Ultra Seal. It’s a premium penetrating sealer that soaks into the pores of the stone protecting it from within, additionally Ultra-Seal doesn’t alter the natural appearance of the stone giving it undetectable protection from staining.
The whole area was then buffed using a white buffing pad.

Limestone Floor Tile and Grout During Sealing in Underriver Sevenoaks

The customer was delighted with the result and will use Tile Doctor going forward to keep the floor protected. We offer an annual maintenance plan for just this, we can return each year and ensure that the floor is kept in tip top shape.

Limestone Floor Tile and Grout After Cleaning in Underriver Sevenoaks

For day-to-day cleaning, I recommended using Tile Doctor Neutral Tile Cleaner, it’s a mild pH neutral cleaning product that and will keep the floor maintained and won’t impact the sealer which can be a problem with stronger products.

Limestone Floor Tile and Grout After Cleaning in Underriver Sevenoaks


Professional Maintenance of a Limestone Flooring in North Kent

Limestone Floor with Dirty Grout Renovated in Underriver, Sevenoaks Read More »

Scroll to Top