Author name: Graham Davis

Covering North Kent, Graham Davis is your local specialist for tile cleaning, stone cleaning, grout cleaning and tile, stone and grout sealing covering the restoration of all types of stone and tiled flooring including Ceramic, Limestone, Marble, Porcelain, Quarry, Sandstone, Slate, Terracotta, Terrazzo, Travertine and Victorian tile

Victorian Pathway Restoration Chatham

Damaged Victorian Tiled Path Restored in Chatham Kent

Tile Doctor was contacted by a couple in Chatham, Kent wishing to explore the options for repairing the badly damaged and worn Victorian pathway that led up to their property. I arranged a time to take a look at the path, conduct a survey of its condition and produce a quotation for restoring it; this is something we are happy to do free of charge.

I could see immediately that many of the tiles in the path were damaged so I started by closely inspecting each tile and cataloguing the missing and badly damaged tiles that I would need to find replacements for. Whilst there I discussed in detail the process, timescales and results they could expect from a 100-year-old pathway. As is so often the case with very old floors and paths, perfection is not sought after – time and again it is all about preserving the character.

Victorian Pathway Before Cleaning Chatham

Once all questions had been answered, I went away and put together a quote. I calculated that the work would take a week to complete, given that there were 194 tiles to replace. Happy with the submitted quote, we booked the dates, prayed for dry weather and the replacement tiles were ordered.

Repairing and Cleaning a Victorian Tiled Pathway

The first two days were spent removing the broken tiles and preparing the path for the replacement tiles. This is tricky work as removing a tile can upset the tiles adjacent thereby making the job bigger and best avoided. Work progressed steadily until the middle of the week when work was interrupted with rain showers but I managed to progress nevertheless. The tiles were replaced and left to set overnight and the next day the deep clean started.

Victorian Pathway During Restoration Chatham

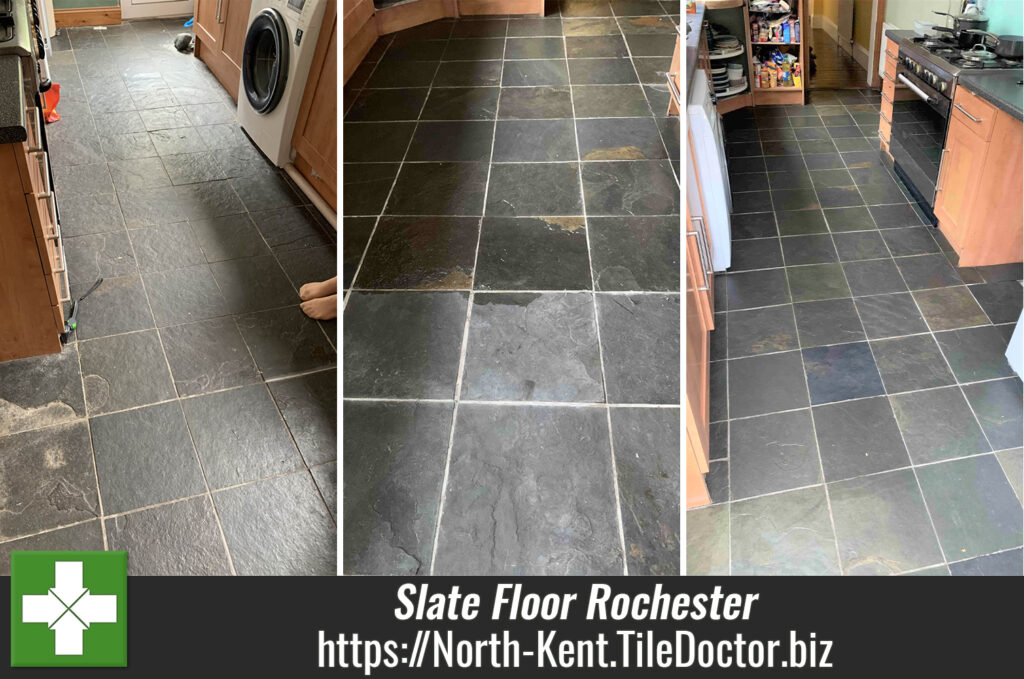
To remove what looked like a 100-years of dirt I applied a coarse Flexi-Segment Diamond pad fitted to a weighted floor buffer and lubricated with a strong dilution of Tile Doctor Pro-Clean which is a powerful alkaline tile cleaner. This shifted the worst of the ingrained dirt turning the cleaning solution into a dark slurry as I went. The slurry was then rinsed off with water and extracted from the path using a wet vacuum.

This process was then repeated using a medium 800-Grit burnishing pad with just water, to perform a second and final clean. Again, the wet vacuum was used at this point to get the path as dry as possible and then left overnight to fully dry out.

Victorian Pathway After Cleaning Chatham

Sealing a Victorian Tiled Pathway

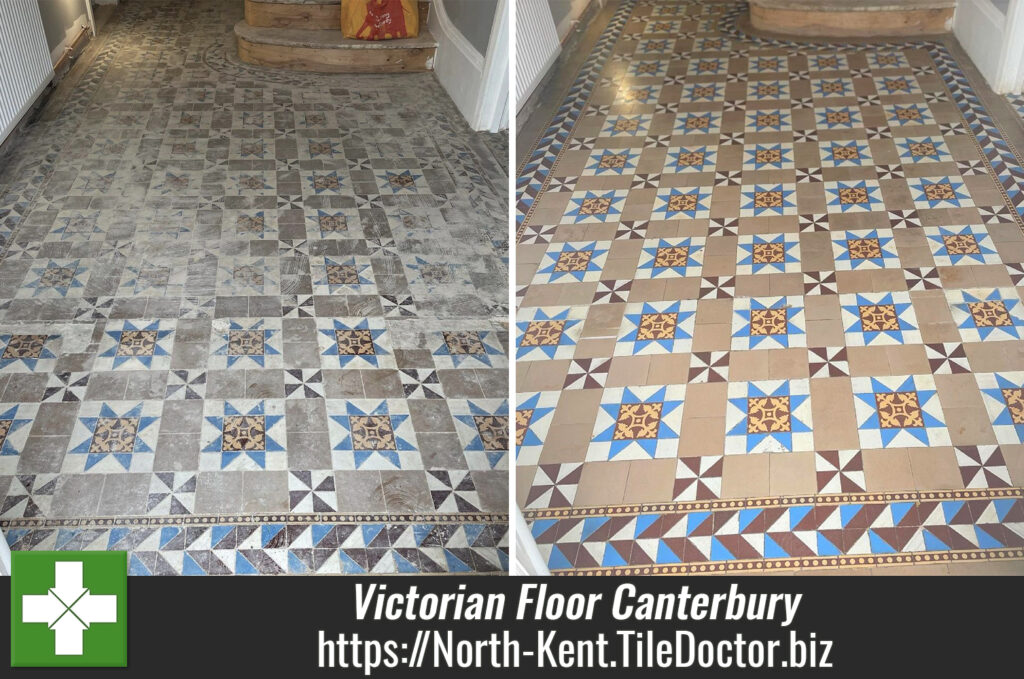
The following morning, happy that the tiles were dry enough, I started applying a sealer to protect them staining going forward. The sealer chosen for Tile Doctor X-Tra Seal which is an oil-based impregnator that’s rated for external use and contains a UV protector to provide greater resilience to the weather.

Victorian Pathway After Sealing Chatham

The pathway then needed 12 hours to be left alone for the sealer to fully dry and cure before allowing any foot traffic. Once the sealer had cured the inbuilt colour enhancer had worked well on the Victorian tiles giving them more depth and vibrancy. I was really pleased with the finish, as were both the customers.


Professional Restoration of a Victorian Path in Kent

Damaged Victorian Tiled Path Restored in Chatham Kent Read More »

Blue Travertine Kitchen Floor Tiles Renovated in Sandwich Kent

Blue Travertine Tiled Kitchen Floor Renovated in Sandwich

This client from Sandwich had a Blue Travertine floor in their kitchen which is not as common as its ‘Yellow’ cousin but certainly more interesting to look it. It does however have the same maintenance requirements and unless the sealer is maintained will trap dirt. This happens very gradually over many years until one day you look down at the floor and think, ‘How did that happen?!’

Blue Travertine Kitchen Floor Tiles Before Cleaning Sandwich

I visited the property to conduct a free survey of the floor and assured the client that the appearance of their unique Blue Travertine floor could be restored with a deep clean, polish and fresh sealer. I explained the renovation plan and the costs involved which they were happy to accept and a date agreed for the work to start.

Cleaning a Travertine Tiled Kitchen and Utility Floor

On day 1 work started with cleaning the grout lines using Tile Doctor Pro-Clean which is a strong industrial strength alkaline cleaner. Its applied to the grout lines, left to soak in for a while and then scrubbed in using a stiff brush by hand. This process lifts the dirt from the grout line into the solution and then extracted from the surface using a wet vacuum.

Next, a 400-grit diamond burnishing pad was applied to the stone floor with using water for lubrication. This is the first step in the honing and polishing process that will remove the ingrained dirt and restore the polished appearance of the Travertine. This was followed by the 800 and then 1500 grit burnishing pads, slowly cleaning and re-building the polish. In between each pad the soiling was extracted with the wet vacuum.

Blue Travertine Kitchen Floor Tiles During Cleaning Sandwich

Once done, it was as far as we could do for the day and we left, allowing the tiles to dry overnight.

Sealing a Travertine Tiled Kitchen and Utility Floor

Returning the next morning work began by checking the moisture readings of the floor using a damp meter. The readings were good and it confirmed the floor was dry and ready for sealing. This check is really important as applying a sealer to a damp floor would impact its ability to cure and result in it looking patchy.

Before applying the sealer, I ran a very fine 3000-grit burnishing pad over the floor to further bring up its polished appearance. This is applied with a small amount of water sprayed onto the tile using a process know as a Spray Burnish. This really finishes off the honing process and by now the floor had a good sheen to it.

The sealer of choice was Tile Doctor’s Ultra Seal a natural look, impregnator that soaks into the pores of the tile protecting it from with and without altering the natural appearance of the honed stone. Two coats were applied and a final buff with a White pad left the kitchen floor looking like you could eat your dinner off it!

Blue Travertine Kitchen Floor Tiles After Renovation Sandwich

My client was very happy with their difference I had made to the Blue Travertine tiles which really looked like they had just been installed.

Lovely guy that came out, arrive in time and kept me informed of progress of the job.do not hesitate to use Tile Doctor.

Before leaving I took time to discuss aftercare cleaning which for a polished stone floor like this, I recommend the use of Tile Doctor Stone Soap which is a gentle cleaning product that won’t impact the sealer and will maintain the patina.


Professional Restoration of a Blue Travertine Tiled Kitchen Floor in Kent

Blue Travertine Tiled Kitchen Floor Renovated in Sandwich Read More »

Limestone Floor Tile and Grout Renovation Underriver

Limestone Floor with Dirty Grout Renovated in Underriver, Sevenoaks

I was asked to survey a Limestone floor at a property in Underriver which is a very rural locality close to Sevenoaks in Kent. The Limestone tiles had been laid throughout the lower ground floor and it was clear to me that the protective sealer had worn off completely allowing dirt to become ingrained in the stone and especially the grout which had turned black.

Limestone Floor Tile and Grout Before Cleaning in Underriver Sevenoaks

I understood from the owner that the grout lines should have been a pale cream colour rather than the black it was now. We discussed the process of restoring the floor including the grout, and I gave them a quote for the work which they were happy to accept.

Limestone Floor Tile and Grout Before Cleaning in Underriver Sevenoaks

Cleaning a Limestone Tiled Ground Floor

Our first job was to tackle the severe soiling in the grout lines. To do this a strong dilution of Tile Doctor Pro-Clean was applied to the floor and left to soak into the stone and especially the grout for about 20 minutes. This was scrubbed in with help from a rotary buffer machine fitted with a soft/medium long-bristled nylon brush.

Limestone Floor Tile and Grout During Cleaning in Underriver Sevenoaks

The resulting slurry was then rinsed with clean water and vacuumed up. I repeated the process in a couple of areas that were particularly heavily soiled. I then spot checked the grout lines and completed the clean with a wire brush and more Tile Doctor Pro-Clean.

Limestone Floor Tile and Grout During Cleaning in Underriver Sevenoaks

With the grout issue resolved I turned my attention to the Limestone tiles for which I used a set of Diamond burnishing pads. Work started with a coarse 400-grit 17” diamond pad fitted to a rotary buffing machine. Then 800 and 1500 grit pads in sequence using water to lubricate the process. The resulting slurry was rinsed off the floor with water after each pad and the soil extracted using a wet vacuum. The floor was then left to dry thoroughly overnight.

Sealing a Limestone Tiled Ground Floor

Returning the next day, the floor was thoroughly vacuumed removed to remove any remaining powder and grit left over from burnishing. This was then followed by applying the last pad in the set which is very fine 3000-grit diamond polishing pad. This last pad really brings up the polished appearance of the limestone, only a little water is used during this action, it’s a process we call a spray burnish. Once done the floor was clean, dry, and ready for a new sealer to be applied.

I had discussed the appearance of different sealers with the customer previously and for this installation we went with Tile Doctor Ultra Seal. It’s a premium penetrating sealer that soaks into the pores of the stone protecting it from within, additionally Ultra-Seal doesn’t alter the natural appearance of the stone giving it undetectable protection from staining.
The whole area was then buffed using a white buffing pad.

Limestone Floor Tile and Grout During Sealing in Underriver Sevenoaks

The customer was delighted with the result and will use Tile Doctor going forward to keep the floor protected. We offer an annual maintenance plan for just this, we can return each year and ensure that the floor is kept in tip top shape.

Limestone Floor Tile and Grout After Cleaning in Underriver Sevenoaks

For day-to-day cleaning, I recommended using Tile Doctor Neutral Tile Cleaner, it’s a mild pH neutral cleaning product that and will keep the floor maintained and won’t impact the sealer which can be a problem with stronger products.

Limestone Floor Tile and Grout After Cleaning in Underriver Sevenoaks


Professional Maintenance of a Limestone Flooring in North Kent

Limestone Floor with Dirty Grout Renovated in Underriver, Sevenoaks Read More »

Large Sandstone Patio Renovated Sevenoaks

Large Sandstone Patio Deep Cleaned in Sevenoaks

I was called to look at a Sandstone patio that had been laid some years before at a property in Sevenoaks and was now in need of renovation. The patio was designed to mirror the White Porcelain tiles in the adjacent kitchen and dining room giving the effect of continuation from house to back garden. As you can see from the photograph this was no longer be the case!

Large Sandstone Patio Before Deep Cleaning Sevenoaks

The UK weather had taken its toll since installation and the patio needed some love and attention to get it back to its original state. The area was quite large and was an ideal spot for entertaining, so they were keen to get the renovation done. I visited site and gave them a quotation for the deep clean work which they were happy to accept. We agreed a date for the work to commence but it would be dependent on the weather.

Cleaning a Sandstone Tiled Patio Floor

Fortunately, the weather gods have been kind to us and I was able to start the work on the agreed date. To loosen off the excessive black and white spot fungi I began by giving the patio a jet wash. Then a liberal dose of Tile Doctor Pro-Clean was applied which was left to soak in for ten minutes and break down the soiling. This is a concentrated, multi-purpose high-alkaline cleaner, stripper and degreaser that can be diluted at varying strengths depending on need. It is effective on mildew, algae and other damp festering growths in areas that have been neglected or subjected to heavy use.

After ten minutes the solution was scrubbed into the patio with a rotary floor scrubber fitted with a black scrubbing pad. This action lifted the dirt, and the slurry was vacuumed off. The next process in removing the remaining stubborn marks and blemishes was to use Tile Doctor Patio & Brick Driveway Cleaner. This is a very strong product which was applied neat and left for two hours to allow time to break down the deep-seated staining. When sufficient time had been allowed for the product to work, the area was rinsed off thoroughly using the pressure washer again. The patio looked a lot cleaner already, there were just a few rust marks to deal with.

Removing Rust Stains from a Sandstone Tiled Patio

Now that the patio was clean, I applied Tile Doctor Rust Away to remove rust marks left by the garden furniture over the winter. This turned the stains into a purple residue as the chemicals started reacting with the rust. The residue was rinsed off as before and the whole patio given one final rinse with water before leaving it to dry in the sun.

Large Sandstone Patio After Deep Cleaning Sevenoaks

I think you can agree that the results were amazing, and the patio once again was a near match to the interior flooring. My clients were over the moon with the transformation. I suggested they may wish to use the annual maintenance plan, where we could return annually to maintain the patio which would prevent it from getting this bad again. They agreed this would be a good way forward.


Professional Restoration of a Sandstone Tiled Patio in North Kent

Large Sandstone Patio Deep Cleaned in Sevenoaks Read More »

Quarry Tiled Kitchen Floor Renovated in Canterbury Kent

Renovating a Paint-Stained Quarry Tiled Kitchen Floor in Canterbury

This Quarry tiled floor at a property in Canterbury had sustained a lot of paint staining from the owner’s friend who had decorated the kitchen and toilet. The customer was a builder and realised how much work would it be to resolve the problem, especially without the correct tools and know how. So, he contacted Tile Doctor and I arranged to perform a survey.

Structurally the Quarry tiles were sound, but the straining was quite obvious, especially near the walls and there was also a section of tiles in the middle of the floor that had been replaced and didn’t quite blend in.

Quarry Tiled Floor Before Renovation Canterbury Quarry Tiled Floor Before Renovation Canterbury

I provided a quote for stripping the floor of the paint stains and remaining sealer and then resealing to give the whole floor a consistent appearance. Happy with my quote we scheduled a date for my return to renovate the floor.

Quarry Tiled Floor Before Renovation Canterbury Quarry Tiled Floor Before Renovation Canterbury

Removing Paint Staining from a Quarry Tiled Kitchen Floor

To tackle the paint stains and strip off the old sealer I put down in stages Tile Doctor’s Remove and Go which is a multi-purpose stripper formulated with a long dwell-time to remove most sealers, epoxy grout haze, adhesives and, most importantly, paint!

After leaving it to soak in for ten to fifteen minutes the Remove and Go had softened the paint marks enough for them to be removed with a black scrubbing pad. The pad is fitted to a rotary floor buffing machine adding water along the way to help lubricate the process. Once done the soil generated was vacuumed up and then repeated using an application of diluted Tile Doctor Pro-Clean, again the black scrubbing pad was used to lift out the last of the dirt in the tiles and further clean up the grout.

This process was repeated, and some areas spot treated until I was satisfied all the paint staining had been removed. Again, the resulting slurry and rinse water was removed using a wet vacuum before the floor was left to dry completely over the course of a few days.

Sealing a Quarry Tiled Kitchen and Utility Floor

Returning three days later, I took some moisture readings with a damp meter first. The readings were fine so satisfied that the tiles were sufficiently dry, I began applying what would be four coats of Tile Doctor Seal and Go Extra. This product was chosen for its nice low sheen finish that it gives to the floor.

Quarry Tiled Floor During Sealing Canterbury
As you can see from the photos, the paint staining has gone, the replacement tiles have blended in with the original and the whole floor looks much fresher. Needless to say the customer was very happy with the renovation.

Quarry Tiled Floor After Renovation Canterbury
Before leaving I took time to discuss how to look after the floor including the importance of not using an harsh tile cleaning products on the floor which can reduce the life of the sealer. For the regular cleaning of sealed Quarry tiles, I recommend Tile Doctor Neutral Cleaner.

Quarry Tiled Floor After Renovation Canterbury
 

Professional Renovation of a Quarry Tiled Kitchen and Utility in Kent

Renovating a Paint-Stained Quarry Tiled Kitchen Floor in Canterbury Read More »

Terracotta Floor Restoration Sandwich

Dirty Terracotta Floor Deep Cleaned and Sealed in Sandwich

I was called to a property in Sandwich, which is a few miles south of Margate, to look at renovating the Terracotta flooring in the kitchen, dining room and conservatory. The house was originally three cottages and close to the end of a project to convert them into one property.

Terracotta Floor Before Cleaning Sandwich Kent

The floor hadn’t been cleaned in years and the porous nature of the Terracotta tiles meant that the floor had taken on a lot of dirt. During my visit to the property, I carried out a small cleaning test on one of the tiles to show the client what they could expect by way of results. The test went well, and I was able to work out an accurate quote for the renovation. Happy with the test clean and my quote I was booked to do the work and we arranged a convenient date of my return.

Terracotta Floor Before Cleaning Sandwich Kent Terracotta Floor Before Cleaning Sandwich Kent

Sandwich is a beautiful historic part of Kent, it was one of the Cinque Ports and still retains many of its medieval buildings and older properties. As you may have suspected the town also gave the name to the food, we regularly tuck into courtesy of John Montagu who was the 4th Earl of Sandwich.

Cleaning Dirty Terracotta Floor Tiles in Sandwich

Working in sections I started with the application of a strong solution of Tile Doctor Pro-Clean which was left to soak into the tiles for roughly ten minutes. This was then worked into the Terracotta using a 400-grit burnishing pad fitted to a rotary buffer machine. The process generated a lot of red slurry which was vacuumed away using an industrial wet vacuum. The tiles were exceptionally dirty and more rinsing with water, and vacuuming was needed to remove all the soiling.

Terracotta Floor During Cleaning Sandwich Kent

The pad had struggled to reach into the pits of the tiles and recessed grout so for the next step I chose to fit a nylon wire attachment to the floor buffer and run it over the tiles and the especially the grout. This did the job and cleaned out the puts and the grout lines very well. The floor immediately looked significantly better.

Using fresh water with a weak solution of Tile Doctor Grout Clean Up, a mop and bucket the floor was given an acid wash to remove any old grout smears and neutralise any alkaline salts that could lead to efflorescence issues later. Once done the floor was rinsed with more water and the solution vacuumed off the floor. The floor was then left to dry for two days so it would be ready for the next step of sealing.

Sealing Old Terracotta Floor Tiles in Sandwich

Two days later I returned on schedule ready to apply a fresh sealer. I was concerned about the amount of water used during the cleaning process, so I started by checking the moisture level of the tiles with a damp meter.

I was happy with the readings so lost no time in applying the sealer. Three coats of Tile Doctor Colour Grow were applied which is an impregnating breathable sealer that soaks into the Terracotta occupying its pores and preventing dirt from residing there. This product contains a colour enhancing element that really brings out the colour in the Terracotta and being fully breathable it will be able to cope with any moisture rising through the tile which can be an issue with these old floors that don’t have a damp proof membrane.

Terracotta Floor After Cleaning Sandwich Kent

With a sealer now in place protecting the floor any dirt will remain on the surface where it can be easily mopped away. On that note I recommended the use of Tile Doctor Neutral Tile Cleaner for regular cleaning, this will ensure that the floor can be cleaned without compromising the newly applied sealant. Household cleaners tend to contain strong chemicals which will break down the seal prematurely.

Terracotta Floor After Cleaning Sandwich Kent

The client was very happy and left the following feedback, its short but he gets the message across.

‘Graham did an excellent job thank you’


Professional Restoration of a Terracotta Tiled Conservatory, Kitchen and Dining Room Floor in Kent

Dirty Terracotta Floor Deep Cleaned and Sealed in Sandwich Read More »

Victorian Conservatory Floor Birchington-on-Sea

Renovating a Stained Edwardian Conservatory floor in Birchington-on-Sea

This striking Victorian tiled Conservatory floor at a property Birchington-on-Sea was in good physical condition but had been stained with white salt deposits. Additionally, the old sealer on the Victorian tiles had worn down with use and now dirt was becoming trapped in the pores of the tile leaving it looking dull and un-inviting.

Victorian Tiled Conservatory Floor Before Cleaning Birchington-on-Sea

The salt deposit issue is often referred to as efflorescence and normally happens when the floor has no damp proof membrane to prevent moisture rising through the floor and evaporating at the surface. In this case however I suspect it was simply due to the over watering of plants, the water naturally contains salt and when the water evaporates it leaves the salt behind. The Southeast of England is known to be a Hard Water area which means it carries a high level of minerals including Calcium.

Victorian Tiled Conservatory Floor Before Cleaning Birchington-on-Sea

To renovate the Conservatory floor, I proposed giving it a deep clean to remove the dirt, efflorescence and what was left of the old sealer. Once clean and dry I would then apply a fresh sealer.

Removing Efflorescence from a Victorian Tiled Conservatory Floor

Upon my arrival at the house, my first task was to add protection to the skirting boards and adjacent wooden floors. I then created a strong dilution of Tile Doctor Pro-Clean, a versatile, high alkaline cleaner, this would get deep into the tiles and shift the dirt and grime along with the old sealer.

I applied the solution to the surface and left it to soak into the tile for twenty minutes, allowing it to get to work on breaking down the old sealer, staining and ingrained dirt. I then scrubbed this into the tiles using a Tile Doctor 200-grit burnishing pad fitted to a rotary floor machine. This process was repeated in a couple of areas that had the most stubborn stains. After the clean had been completed, I rinsed the entire floor several times and extracted the resulting slurry using a wet vacuum.

Sealing a Victorian Tiled Conservatory Hallway Floor

I left the floor overnight, allowing the floor enough time to dry and returned then next day to seal the floor, checking first to ensure the tiles had dried sufficiently with a damp meter.

To seal the floor, I applied several coatings of Tile Doctor Colour Grow allowing for thirty-minute drying time between each coat. I chose Colour Grow as it’s an impregnator that protects from within by occupying the pores in the tile thereby preventing dirt from becoming ingrained there. This product also contains a colour enhancing component that deepens the colour in the tile. Finally, it leaves a nice matt sheen appearance.

Victorian Tiled Conservatory Floor After Cleaning Birchington-on-Sea

As you can see from the before and after photos, the white salt stains were gone, and the tiles now have a very clean consistent appearance. The fresh seal should ensure it stays that way for some years to come.

My client was extremely pleased with my work and left the following positive feedback.

“Graham was very professional, he made a great job of our Edwardian tiles. I would recommend him.”

Victorian Tiled Conservatory Floor After Cleaning Birchington-on-Sea

For aftercare cleaning I recommended the use of Tile Doctor Neutral Tile Cleaner. This is a pH neutral cleaner, which will ensure the newly applied seal retains its integrity. Household cleaners are generally too strong for sealed surfaces and tend to break down the sealer prematurely taking the floor back to square one. Using the correct product will ensure the longevity of the new seal.


Professional Floor Renovation of an Edwardian Conservatory in North Kent

Renovating a Stained Edwardian Conservatory floor in Birchington-on-Sea Read More »

Gruby Porcelain Kitchen Floor Deep Cleaned Eynsford Sevenoaks

Dirty Porcelain Floor Tile and Grout Deep Cleaned in Eynsford

The picture below shows a grubby Porcelain tiled floor at a property in Eynsford just North of Sevenoaks. Installed throughout much of the ground floor including the kitchen, lounge, and dining room the porcelain tile and grout was in a very dirty state and the client was desperate to get them clean.

Porcelain Tile and Grout Before Cleaning Eynsford

The floor had trapped dirt in the high traffic areas and the grubby appearance was bringing down the appearance of the area which was a shame as the kitchen was lovely. The client had tried all the usual household cleaners she could find, and nothing seemed to work so we were asked to call round.

I visited the property to survey the floor and was able to reassure the client that although the tile and grout was stained with dirt that it could be rectified. I was confident we would soon be able to get the floor looking great again and demonstrated the process I would use on a small part of the floor. The demonstration went well and happy with the result we agreed on a date for my return to complete the work.

Deep Cleaning a Porcelain Tile Floor

To deep clean the Porcelain tile and grout a strong dilution of Tile Doctor Pro-Clean (3 parts cleaner to 5 parts water) was sprayed onto the floor and then left to soak in for a good twenty minutes. This delay allows the Pro-Clean to get to reach into the pores of the tile and grout where it can break down the dirt.

Then using a rotary floor machine fitted with a black scrubbing pad the solution was scrubbed into the tile lifting out the dirt and turning the cleaning solution black in the process. Tile Doctor Pro-Clean is a concentrated, multi-purpose high-alkaline cleaner which is designed for deep cleaning tiles, stone and grout of dirt and grease and can also remove sealers. Exactly what was needed on this floor.

Pads can struggle to reach into the recesses of the grout line so once I was finished with the tiles, I hand scrubbed the grout with a wire brush. This is harder work, but the results justify the effort. The floor was then rinsed with water and the resultant soil was extracted off the floor with a wet vacuum. The tile and grout looked instantly better, and I knew the client would be pleased with the result.

Porcelain Tile and Grout After Cleaning Eynsford

Most Porcelain floor tiles are sealed in the factory when they are manufactured, so there was no need to apply a sealer in this case. I did however recommend the use of Tile Doctor Neutral Tile Cleaner for maintenance cleaning, it’s concentrated a small amount goes a long way, and it has a nice fresh fragrance. This will ensure the floor is kept in good condition moving forward.

As you can imagine my client was relieved to have the floor looking as good as new again!

Porcelain Tile and Grout After Cleaning Eynsford


Professional Restoration of a Porcelain Tiled Floor in North Kent

Dirty Porcelain Floor Tile and Grout Deep Cleaned in Eynsford Read More »

Slate Kitchen Floor Tile Renovation Rochester Kent

Rejuvenating a Slate Tiled Kitchen Flooring in Rochester

The photographs below are of Slate tiled Kitchen floor at a property in the historic Kent city of Rochester. It had been a while since the stone had been given a deep clean and seal, so the floor was looking tired and in need of rejuvenating. The occupants were unhappy with its appearance and wanted the life putting back into what was once an attractive floor to be proud of.

Grey Slate Kitchen Floor Before Cleaning Rochester

You can see from the photo above that the Slate tiles were looking dull and washed out, some areas had water staining and in places the grout was heavily stained. Kitchen floors do experience the most wear and of course being in a kitchen they can suffer from accidental spillages etc. Thankfully, we at Tile Doctor are perfectly equipped to deal with these issues so I was confident we could resolve all the problems and dramatically improve its appearance.

Cleaning a Brazilian Slate Tiled Floor

My first course of action was to focus on cleaning the Slate and Grout, the latter of which needed some serious attention. For this a created a strong solution of our reliable high-alkaline tile and grout cleaning product, Tile Doctor Pro-Clean. The solution was applied to the floor, left for ten minutes so it could get to work and then and agitated into the tile and grout using specialised grout brushes and a professional floor buffer fitted with a 17”, circular, nylon brush. This not only cleaned the tiles but also removed any old sealant remaining on the floor. The pads do struggle to reach into the recesses of the grout lines, so I followed up scrubbing the grout by hand using a wire brush and more Pro-Clean.

The floor was rinsed with water and the resulting slurry was quickly extracted using a wet vacuum. The floor was then given an acid wash using a weak dilution of Tile Doctor Grout Clean-Up. This product is made from concentrated phosphoric acid and is great for removing grout smears and salts from the tile and grout ensuring there’s nothing that can detract from the natural appearance of the stone. Giving the floor an acid rinse also ensures a better bond with the sealer.

The floor was given a final rinse and mop with plain water to neutralise the tile and grout after remove any trace of cleaning product. This was followed up with the wet vacuum ensuring the floor was as dry as it could be by the end of the first day.

Grey Slate Kitchen Floor During Cleaning Rochester

Sealing a Slate Tiled Kitchen Floor

I then left the floor to dry off overnight and returned the next day to apply a fresh sealer that will protect the stone from ingrained dirt and improve its appearance. The floor has to be dry before applying the sealer, so I checked first with a moisture meter on various parts of the floor to be sure.

Happy the floor was dry I started with the application of Tile Doctor X-Tra Seal which is a very modern product oil-based resin formula that provides strong water and stain repellency, ideal for a kitchen. X-Tra Seal has a low sheen finish and contains a colour enhancer that puts the black back into the tiles.

Grey Slate Kitchen Floor After Cleaning Rochester

Once complete the Grout was clean and the Slate was given a new lease of life with its original vigour restored. And of course, the occupants now had a Kitchen floor they could be proud of!


Professional Renovation of a Slate Tiled Floor in Kent

Rejuvenating a Slate Tiled Kitchen Flooring in Rochester Read More »

Victorian Hallway Floor Before After Restoration in Canterbury

Victorian Tiled Hallway Restoration in Canterbury Children’s Home

These pictures of a Victorian Tiled Hallway are from a property in Canterbury that was once a nursing home and was now being renovated to become a children’s home. The building was being gutted and extended at the same time and when the carpet was pulled up in the hallway, they were surprised to find a relatively intact Victorian tiled floor underneath.

Whilst they thought it bizarre that anyone would want to cover up such an attractive floor the carpet had protected it over the years. They realized it would make a marvellous feature at the entrance to the property, but professional restoration would be needed to do it justice. After a bit of research, they came across Tile Doctor and got in touch.

Canterbury comes under my North Kent designation, so I went to visit the property and survey the floor and quote for doing the restoration. There were a few missing and loose tiles that would need replacing and refixing also there was a lot of ingrained dirt so a deep clean and application of a new sealer would be required. I gave them a price for the work which they readily accepted, and we arranged a suitable time to carry out the work. Subject to the building schedule I had calculated the floor would take three days to restore.

Victorian Hallway  Canterbury During Renovation

Repairing and Removing Adhesive from a Victorian Tiled Hallway Floor

On the first day I set about replacing and re-fixing the missing, broken, and loose tiles. This is delicate work as you need to extract the old tile without disturbing its neighbours and then clean up the area ready for its replacement. Being a Tile Doctor I keep a selection of stock tiles for repairs, some are reclaimed, and some are replica. Also, there are several companies still making Victorian style tiles so I can usually source what I need.

After the individual missing and broken tiles had been replaced and the adhesive had set, it was then a matter of renovating the floor as a whole. The tiles were covered in a thick layer of carpet adhesive which needed a combination of specialist tools and products to remove. First, a liberal layer of Tile Doctor Remove and Go was applied and left to dwell for thirty minutes. Next, Tile Doctor Pro-Clean was added and scrubbed in with a black pad.

This process softened the adhesive sufficiently in readiness for the next stage which involves using a set of diamond burnishing pads on a weighted buffing machine. Several applications were needed, each time with a successively finer grade of diamond pad and rinsing off the slurry in between. The tiles were first milled using a very coarse 50-grit pad, followed by 100, 200 and finally burnished with a 400-grit burnishing pads. This removed all the adhesive and dirt in the tiles, which was cleaned up using the wet vacuum.

Old Victorian floors like this do not have a damp proof membrane installed under the floor, and with a lot of water being used in the cleaning process I was concerned White efflorescence salts could appear later as the floor dried. To counter this, I gave the floor an acid wash using Tile Doctor Acid Gel to counter and dissolve the salts, it also gives the tiles another clean and will remove any old grout smears further improving the appearance of the tiles. Once done the floor was left to dry overnight.

Sealing a Victorian Tiled Hallway Floor

On my return I tested the floor was dry by taking several moisture readings around the floor with a damp meter. Applying sealer to a damp floor is never advised and can lead to clouding and an unwanted finish.

Happy that the tiles were dry, a single coat of Tile Doctor Colour Grow sealer was applied. This is an impregnating sealer with a colour enhancing component to ‘lift’ the stronger colours of the floor. Colour Grow however does leave a matt appearance and as the client had asked for a shiny finish it was topped up with five coats of Tile Doctor Seal and Go. This is a compatible topical sealer which added a mid to high sheen.

Victorian Hallway  Canterbury After Renovation

By the end of the third day the Victorian floor looked brand new, and I received the following feedback from the client. Its rare to receive feedback from commercial customers so they were clearly overwhelmed with the transformation.

Did not think this glued covered bad old floor could look sooooo good Fabulous Fantastic job Looks Amazing Thank you

For aftercare I recommend the use of Tile Doctor Neutral Cleaner which isn’t as harsh as many of the products you find in supermarket. Stronger products can actually strip off the sealer over time leaving it vulnerable to dirt and detracting from its appearance.


Professional Restoration of a Victorian Tiled Hallway in North Kent

Victorian Tiled Hallway Restoration in Canterbury Children’s Home Read More »

Scroll to Top